最近の記事「 Cerebras と Docker Compose を使用した分離された AI コード環境の構築」では、Cerebras の友人が、世界最速の Cerebras の AI 推論 API、Docker Compose、ADK-Python、MCP サーバーを使用するコーディング エージェントを構築する方法を紹介しました。
この投稿では、基盤となるテクノロジーをさらに深く掘り下げ、これらの要素がどのように組み合わさって、移植可能で安全で完全にコンテナ化された AI エージェント環境を構築するかを示します。マルチエージェント システムを作成し、Docker Model Runner でローカル モデルを使用して一部のエージェントを実行し、カスタム ツールを MCP サーバーとして AI エージェントのワークフローに統合する方法を学びます。
また、エージェントが記述したコードを実行するための安全なサンドボックスを構築する方法についても触れ、実際の開発におけるコンテナの理想的なユースケースです。
始める
まず、 GitHub からリポジトリ を複製し、プロジェクト ディレクトリに移動します。
エージェントのコードを取得し、.envファイルを使用して Cerebras API キーを提供します。
git clone https://github.com/dockersamples/docker-cerebras-demo && cd docker-cerebras-demo
次に、.env を準備します。ファイルを使用して、Cerebras API キーを提供します。 Cerebras Cloud プラットフォームからキーを取得できます。
# This copies the sample environment file to your local .env file
cp .env-sample .env
次に、 .envファイルをお気に入りのエディターで作成し、API キーを CEREBRAS_API_KEY 行に追加します。それが完了したら、Docker Compose を使用してシステムを実行します。
docker compose up --build
最初の実行では、モデルとコンテナーのプルに数分かかる場合があります。起動すると、 localhost:8000でエージェントを確認できます。
最初の実行では、必要な Docker イメージと AI モデルをプルするのに数分かかる場合があります。実行されると、 http://localhost:8000でエージェントのインターフェイスにアクセスできます。そこから、エージェントと対話して、「コードを書く」、「サンドボックス環境を初期化する」などのコマンドを発行したり、「cerebras、curl docker.com please 」などの特定のツールをリクエストしたりできます。
アーキテクチャを理解する
このデモは、エージェントを 3 つのコア コンポーネントに分割する Compose for Agents リポジトリのアーキテクチャに従っています。
- エージェントループ: これは、エージェントの動作を調整する主要なアプリケーションロジックです。この場合、これは ADK-Python ベースのアプリケーションです。ADK-Python フレームワークには、ツール呼び出しを検査し、システムがどのように特定の決定に到達したかを追跡できるビジュアライザーも含まれています。
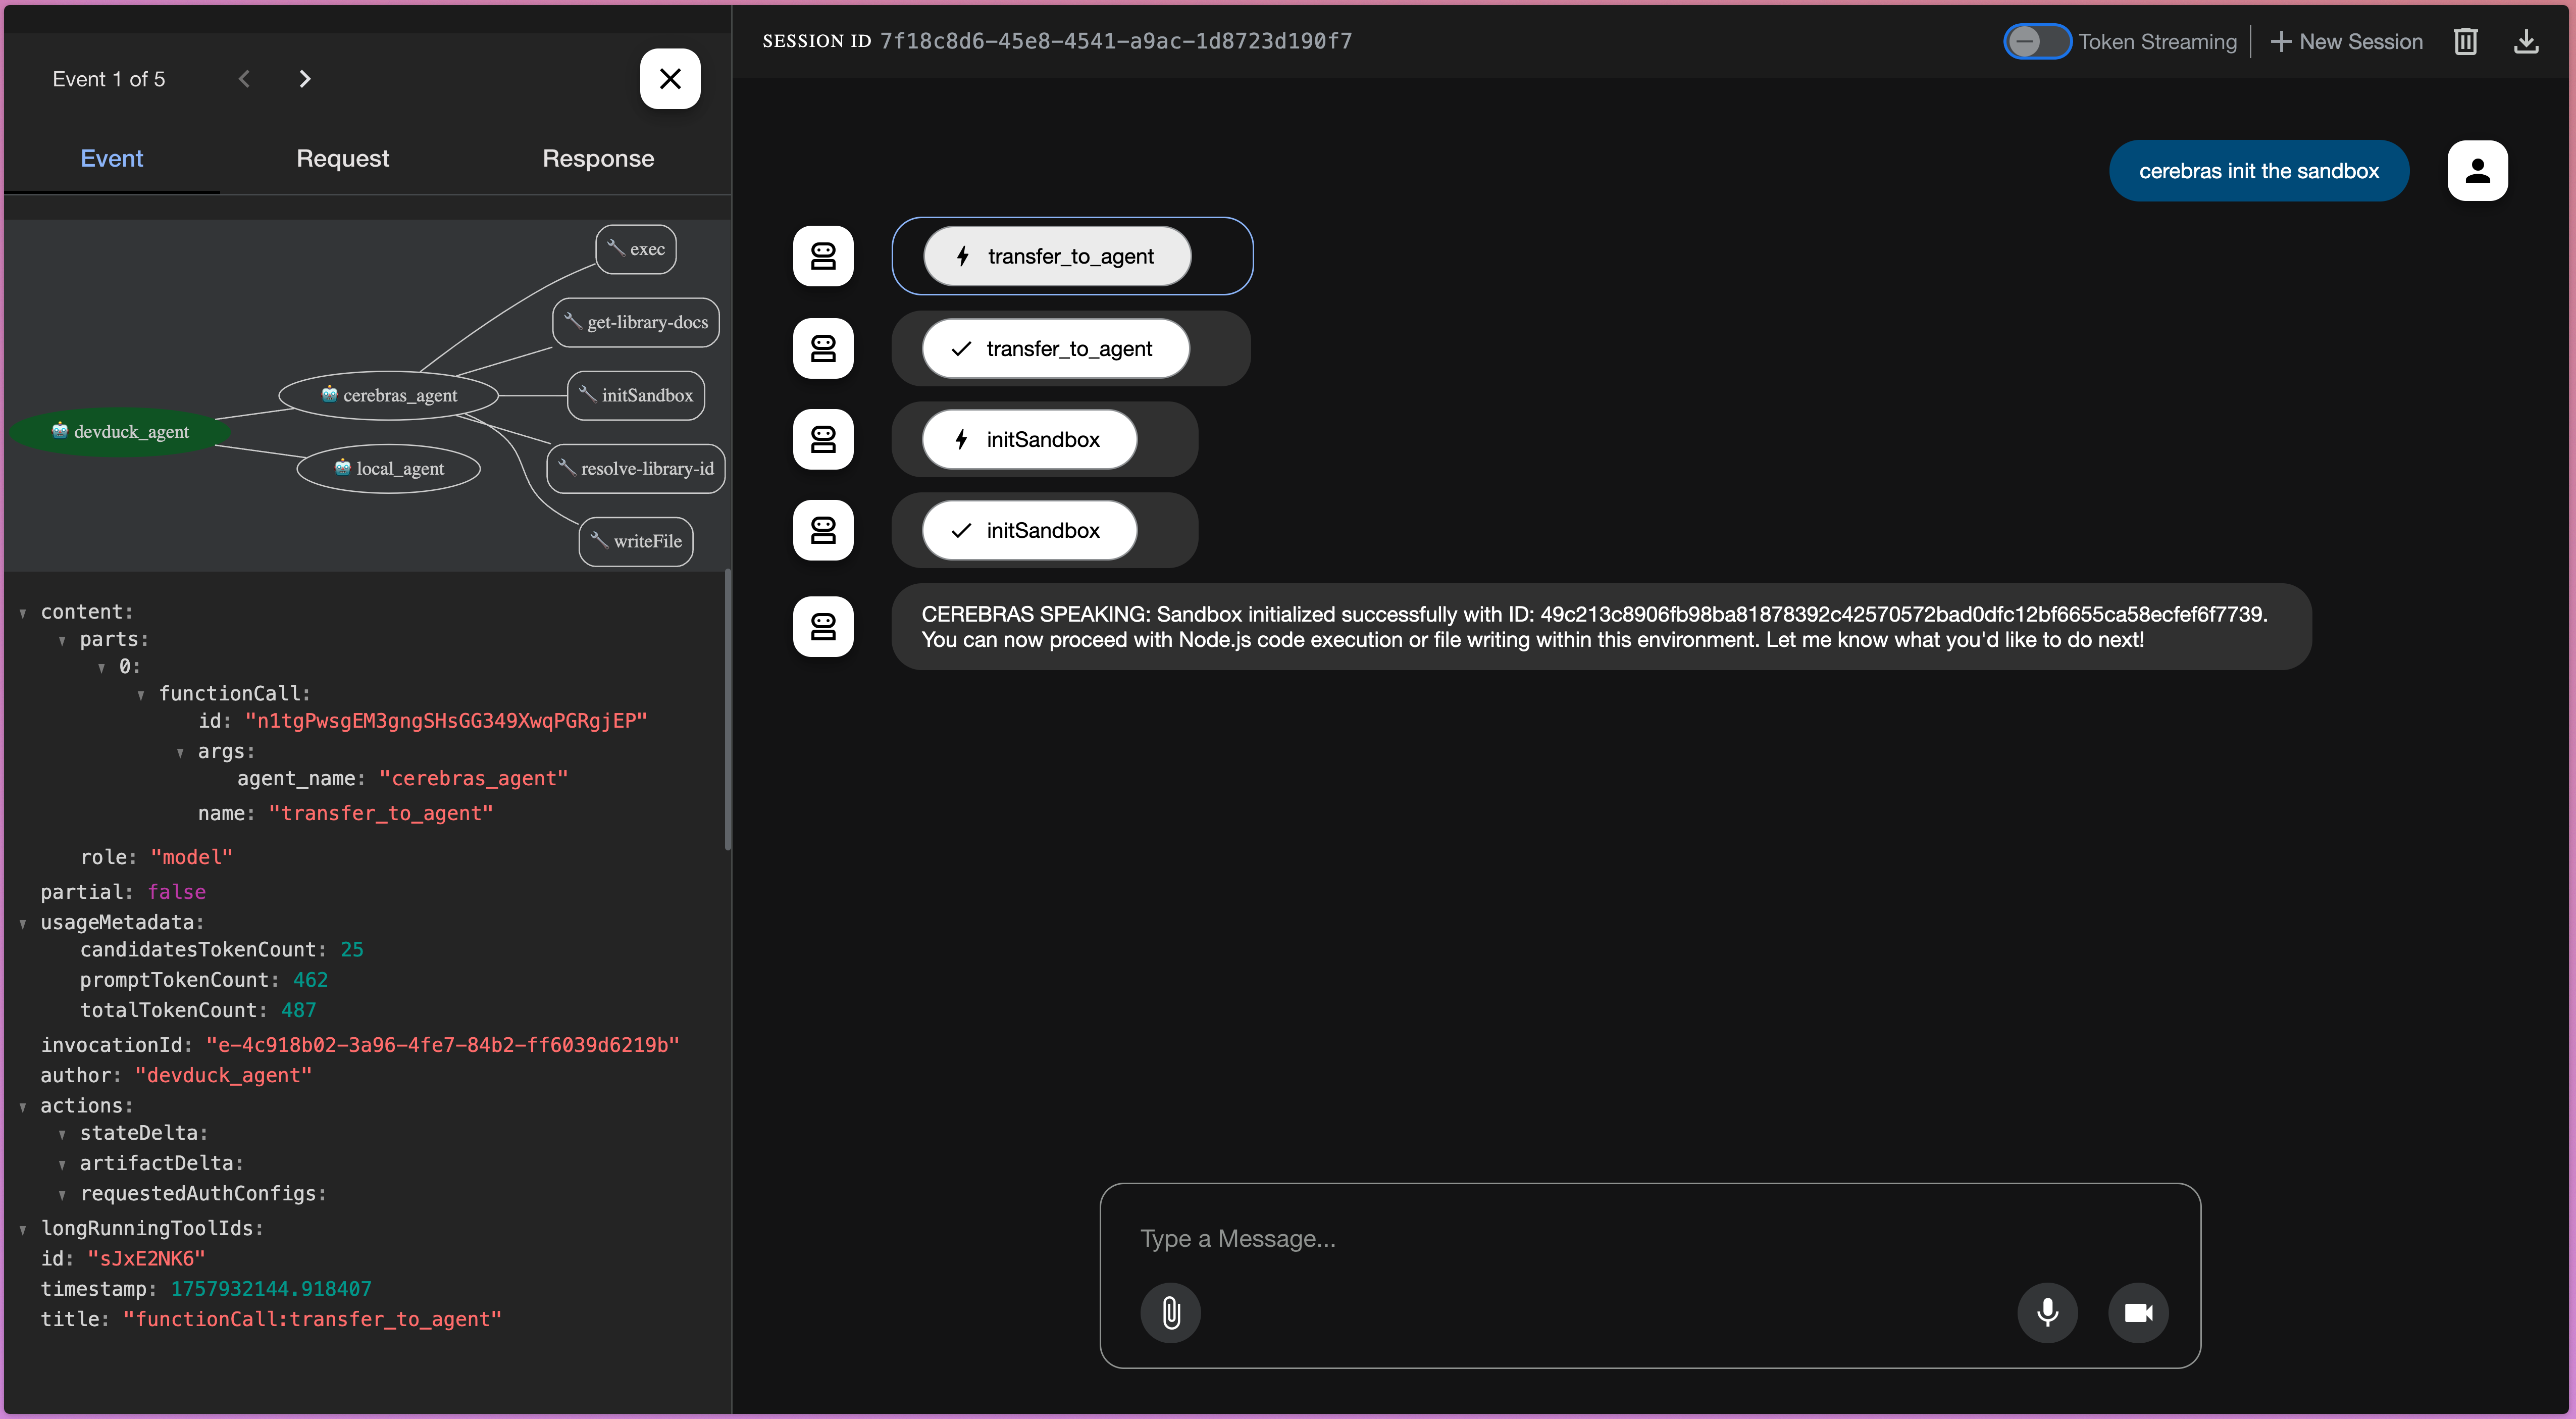
- MCPツール:これらは、エージェントが使用できる外部ツールです。Docker MCP ゲートウェイを介して安全に提供します。このアプリでは、コンテキスト7 とノードサンドボックスのMCPサーバーを使用します。
- AI モデル: 使用するローカルまたはリモートの AI モデルを定義できます。ここでは、ローカルエージェントと、Cerebras APIを使用する強力なCerebrasエージェントとの間のルーティングに、ローカルQwenモデルを使用しています。
Cerebras Cloud は、特殊な高性能推論バックエンドとして機能します。5兆パラメータのQwenコーダーのような大規模なモデルを毎秒数千のトークンで実行できます。私たちの簡単なデモではこのレベルの速度は必要ありませんが、このようなパフォーマンスは実際のアプリケーションにとって大きな変革をもたらします。
ほとんどのプロンプトと応答は、サンドボックスを初期化したり、サンドボックスにJavaScriptコードを記述したりするための単純なコマンドであるため、数百トークンの長さです。エージェントにもっと一生懸命働かせて、より冗長なリクエストで Cerebras のパフォーマンスを確認することは大歓迎です。
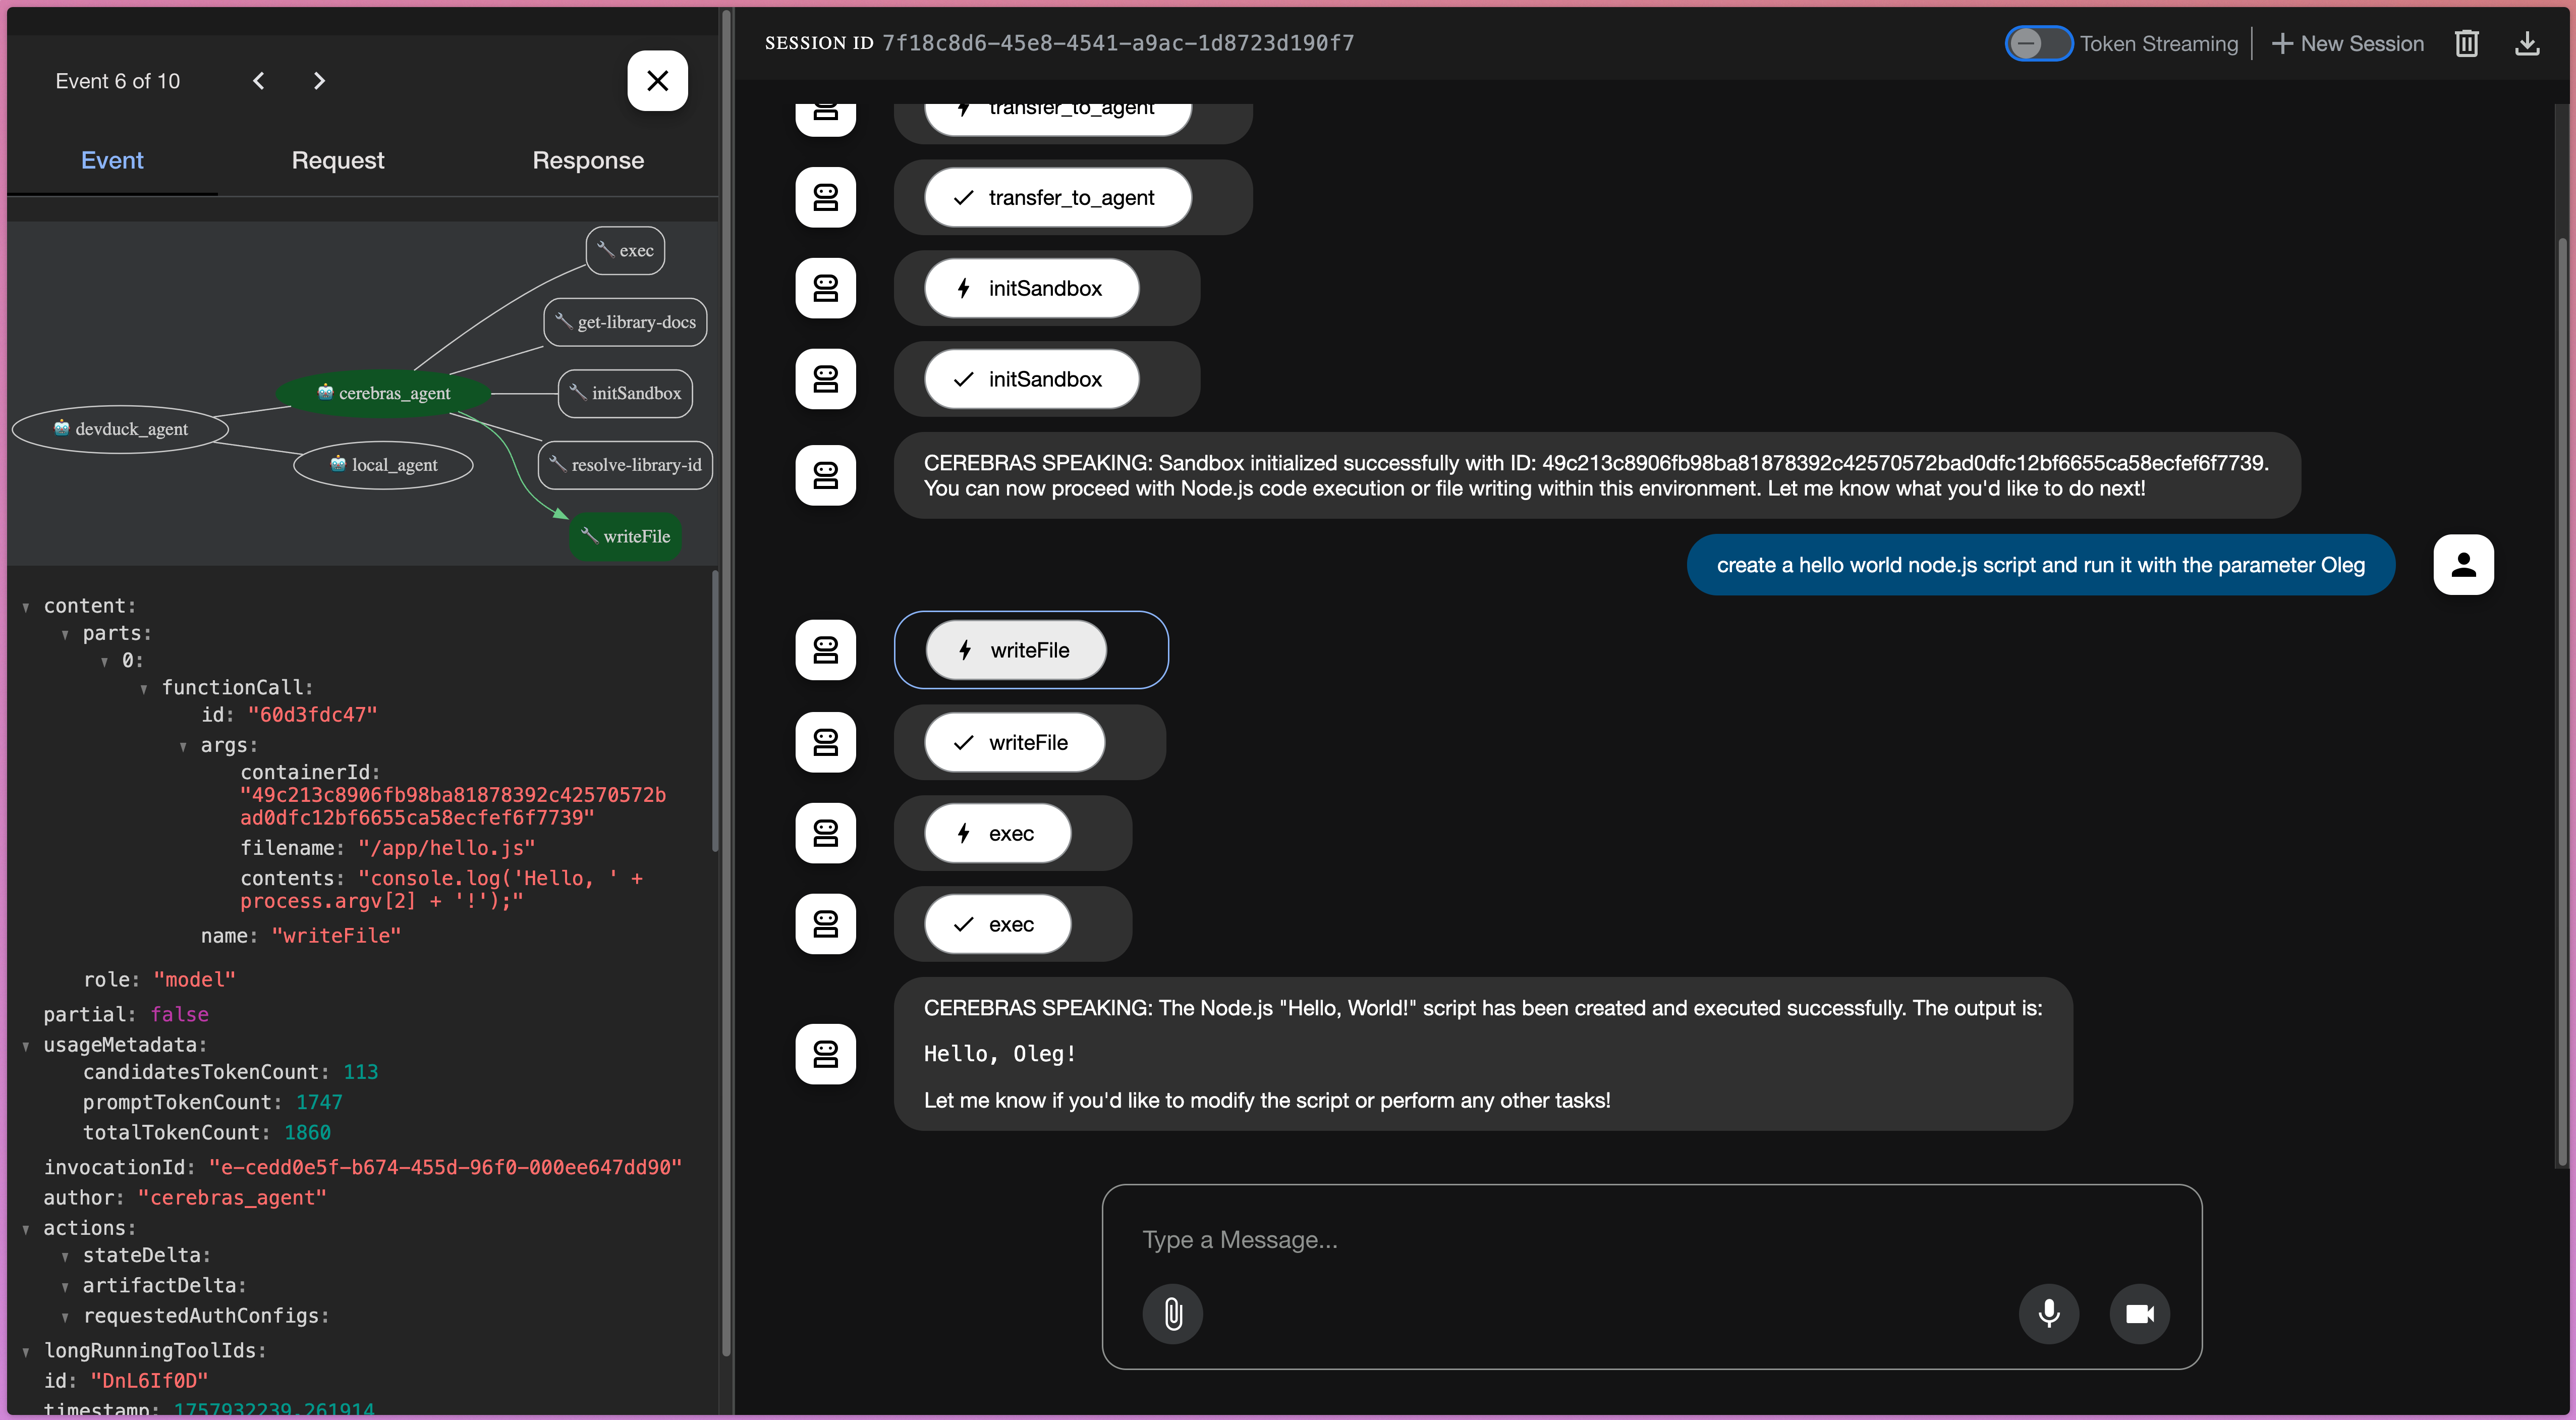
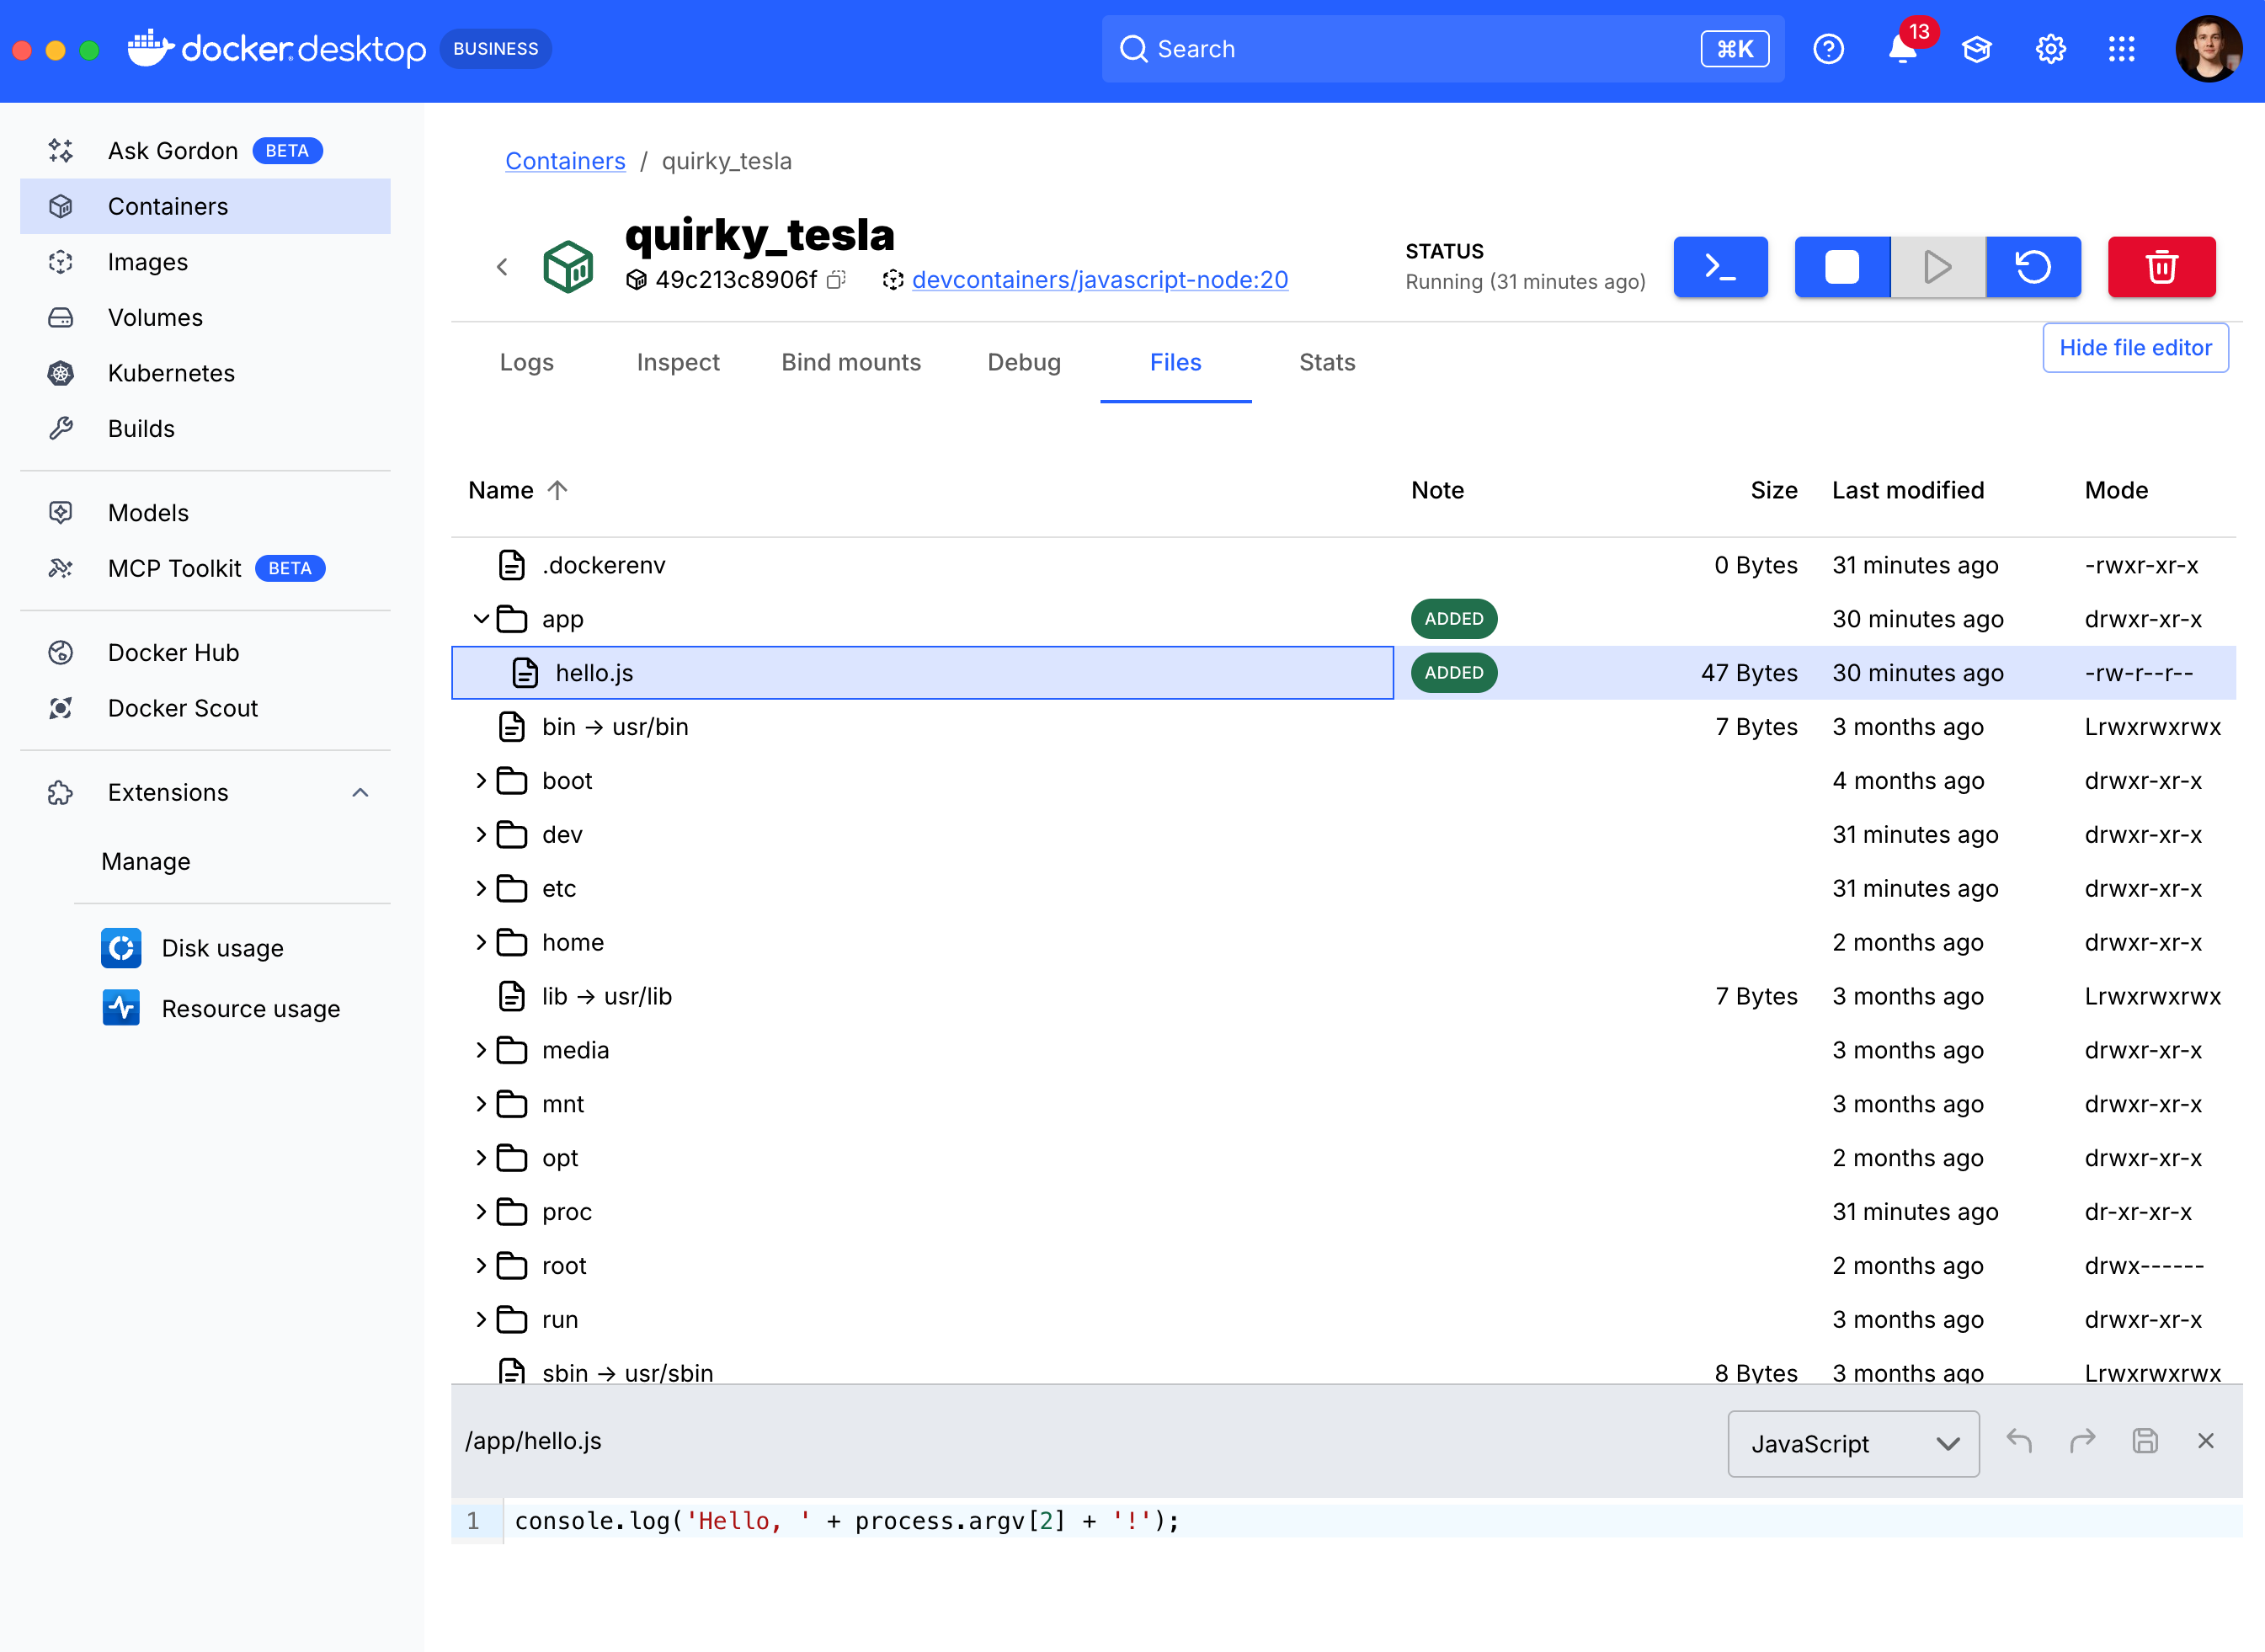
たとえば、Cerebras エージェントに JavaScript コードを記述するように依頼すると、MCP ツールから関数を呼び出してファイルを読み書きし、下のスクリーンショットに示すように実行することができます。
MCP サーバーとしてのカスタム サンドボックスの構築
このセットアップの主な機能は、コード実行用の安全なサンドボックスを作成できることです。これを行うには、カスタム MCP サーバーを構築します。この例では、2 つの MCP サーバーを有効にします。
context7: これにより、エージェントはさまざまなアプリケーションフレームワークの最新のドキュメントにアクセスできます。node-code-sandbox: これは、エージェントが記述したコードを実行するためのカスタムメイドのサンドボックスです。
Node.jsサンドボックスサーバーの実装は、 node-sandbox-mcp GitHubリポジトリにあります。これはJavaで書かれたQuarkusアプリケーションで、自らを stdio mcp-serverとして公開し、素晴らしい Testcontainersライブラリ を使用してサンドボックスコンテナをプログラムで作成および管理します。
重要な詳細は、サンドボックス構成を完全に制御できることです。共通のNode.js開発イメージでコンテナを開始し、重要なセキュリティ対策として、そのネットワークを無効にします。ただし、これはカスタム MCP サーバーであるため、必要と思われるセキュリティ対策を有効にすることができます。
コンテナの作成に使用されたTestcontainers-javaコードのスニペットを次に示します。
GenericContainer sandboxContainer = new GenericContainer<>("mcr.microsoft.com/devcontainers/javascript-node:20")
                .withNetworkMode("none") // disable network!!
                .withWorkingDirectory("/workspace")
                .withCommand("sleep", "infinity");

 sandboxContainer.start();
Testcontainers は、サンドボックスと対話するための柔軟で慣用的な API を提供します。コマンドの実行またはファイルの書き込みは、単純な 1 行のメソッド呼び出しになります。
// To execute a command inside the sandbox
sandbox.execInContainer(command);

// To write a file into the sandbox
sandbox.copyFileToContainer(Transferable.of(contents.getBytes()), filename);
実際の実装では、バックグラウンドプロセスを管理したり、複数のサンドボックスを作成した場合に正しいサンドボックスを選択したりするためのグルーコードがもう少しありますが、これらのワンライナーはインタラクションの中核です。
カスタム サーバーのパッケージ化と使用
カスタムサーバーを使用するには、まずDockerイメージとしてパッケージ化する必要があります。Quarkusアプリケーションの場合、1つのコマンドでうまくいきます。
./mvnw package -DskipTests=true -Dquarkus.container-image.build=true
このコマンドは、ローカルのDockerイメージを生成し、その名前を出力します。
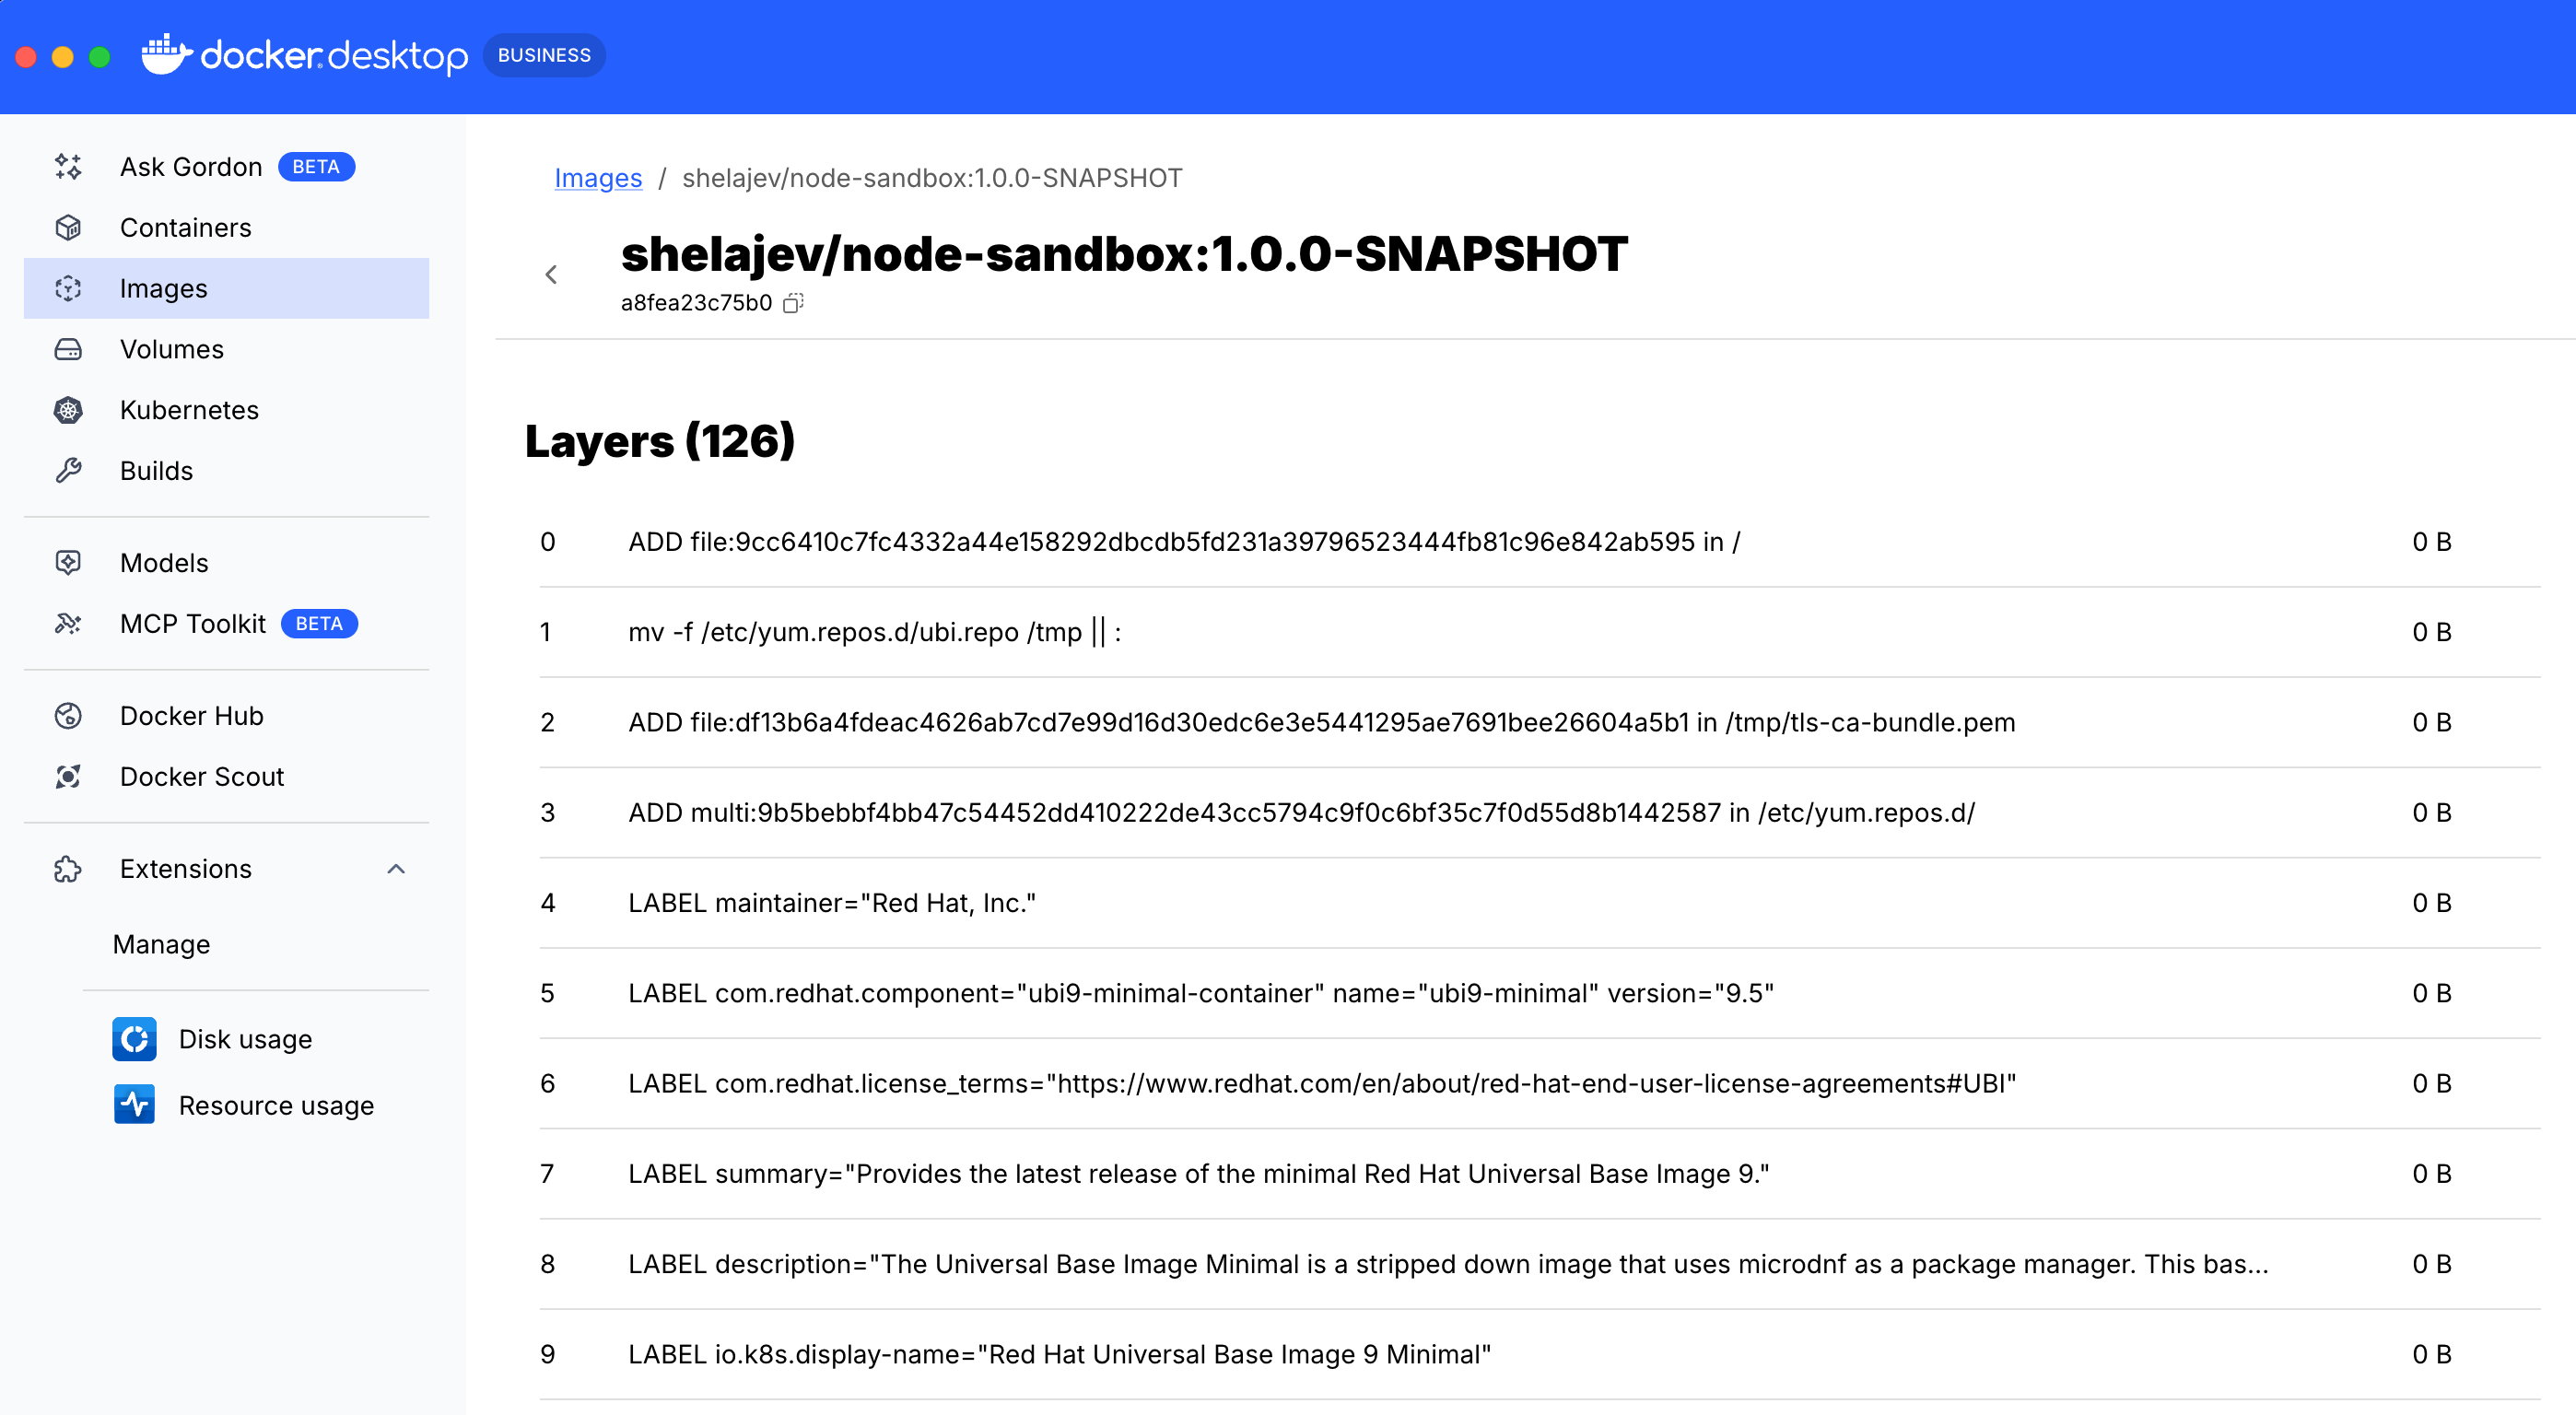
[INFO] [io.quarkus.container.image.docker.deployment.DockerProcessor] Built container image shelajev/node-sandbox:1.0.0-SNAPSHOT
すべてをローカルで実行しているため、このイメージをリモートレジストリにプッシュする必要さえありません。このイメージを Docker Desktop で検査し、次のステップで使用するハッシュを見つけることができます。
MCP ゲートウェイを介したサンドボックスの統合
カスタムMCPサーバーイメージの準備ができたら、 MCPゲートウェイに接続します。標準の context7 サーバーと新しい node-code-sandbox の両方を有効にするカスタムカタログファイル( mcp-gateway-catalog.yaml)を作成します。
現在、このファイルの作成は手動プロセスですが、簡素化に取り組んでいます。その結果、標準 MCP サーバーとカスタム MCP サーバーが混在するポータブル カタログ ファイルが作成されます。
カタログ内の node-code-sandbox MCP サーバーの構成で、次の 2 つの重要な点に注目してください。
longLived: true: これは、サンドボックスの状態を追跡するために、サーバーがツール呼び出しの間に保持する必要があることをゲートウェイに通知します。image:: 再現性を確保するために、sha256ハッシュを使用して特定の Docker イメージを参照します。
サンドボックス MCP のカスタムサーバーを構築する場合は、イメージ参照をビルドステップで生成されたものに置き換えることができます。
    longLived: true
    image: olegselajev241/node-sandbox@sha256:44437d5b61b6f324d3bb10c222ac43df9a5b52df9b66d97a89f6e0f8d8899f67
最後に、このカタログファイルをマウントし、両方のサーバーを有効にするように docker-compose.yml を更新します。
  mcp-gateway:
    # mcp-gateway secures your MCP servers
    image: docker/mcp-gateway:latest
    use_api_socket: true
    command:
      - --transport=sse
      # add any MCP servers you want to use
      - --servers=context7,node-code-sandbox
      - --catalog=/mcp-gateway-catalog.yaml
    volumes:
      - ./mcp-gateway-catalog.yaml:/mcp-gateway-catalog.yaml:ro
docker compose upを実行すると、ゲートウェイが起動し、node-sandboxMCPサーバーが起動します。エージェントがサンドボックスを要求すると、3 番目のコンテナー (実際の分離環境) が起動されます。
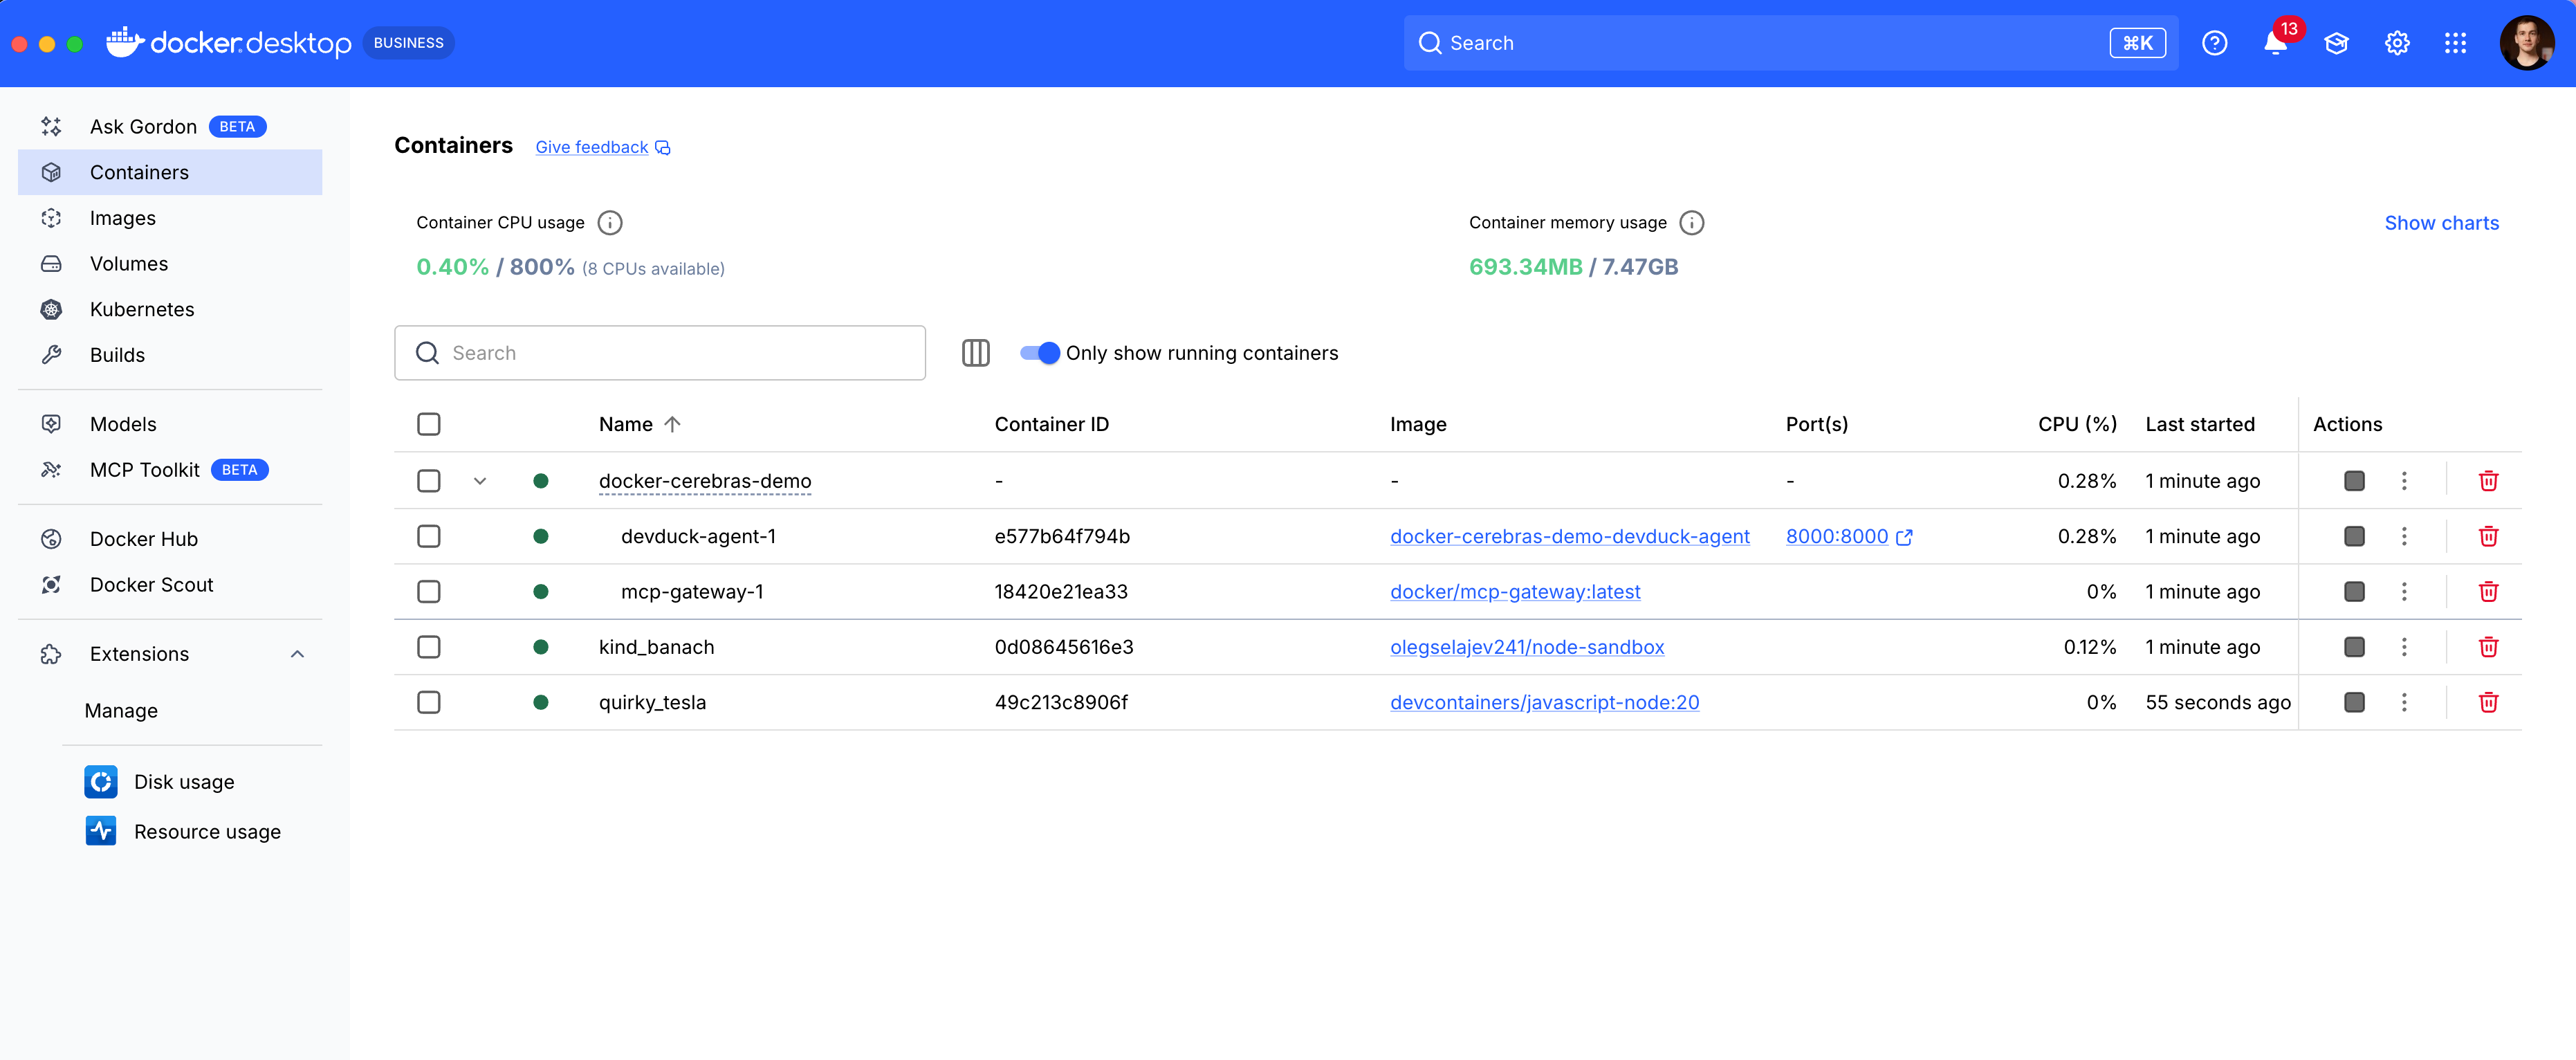
Docker Desktop などのツールを使用して、実行中のすべてのコンテナーを検査したり、ファイルを表示したり、デバッグのためにシェルを開いたりすることもできます。
コンテナ化されたサンドボックスのセキュリティ上の利点
このコンテナ化されたサンドボックスのアプローチは、セキュリティ上で大きなメリットをもたらします。コンテナーは、ホスト マシンでランダムなインターネット コードを実行するよりも小さな脆弱性プロファイルで、十分に理解されたセキュリティ境界を提供し、必要に応じて強化できます。
サンドボックスコンテナでネットワークを無効にした方法を覚えていますか?これは、エージェントが生成するコードがローカルの秘密やデータをインターネットに漏洩できないことを意味します。たとえば、 google.com へのアクセスを試みるコードを実行するようにエージェントに要求すると、失敗します。
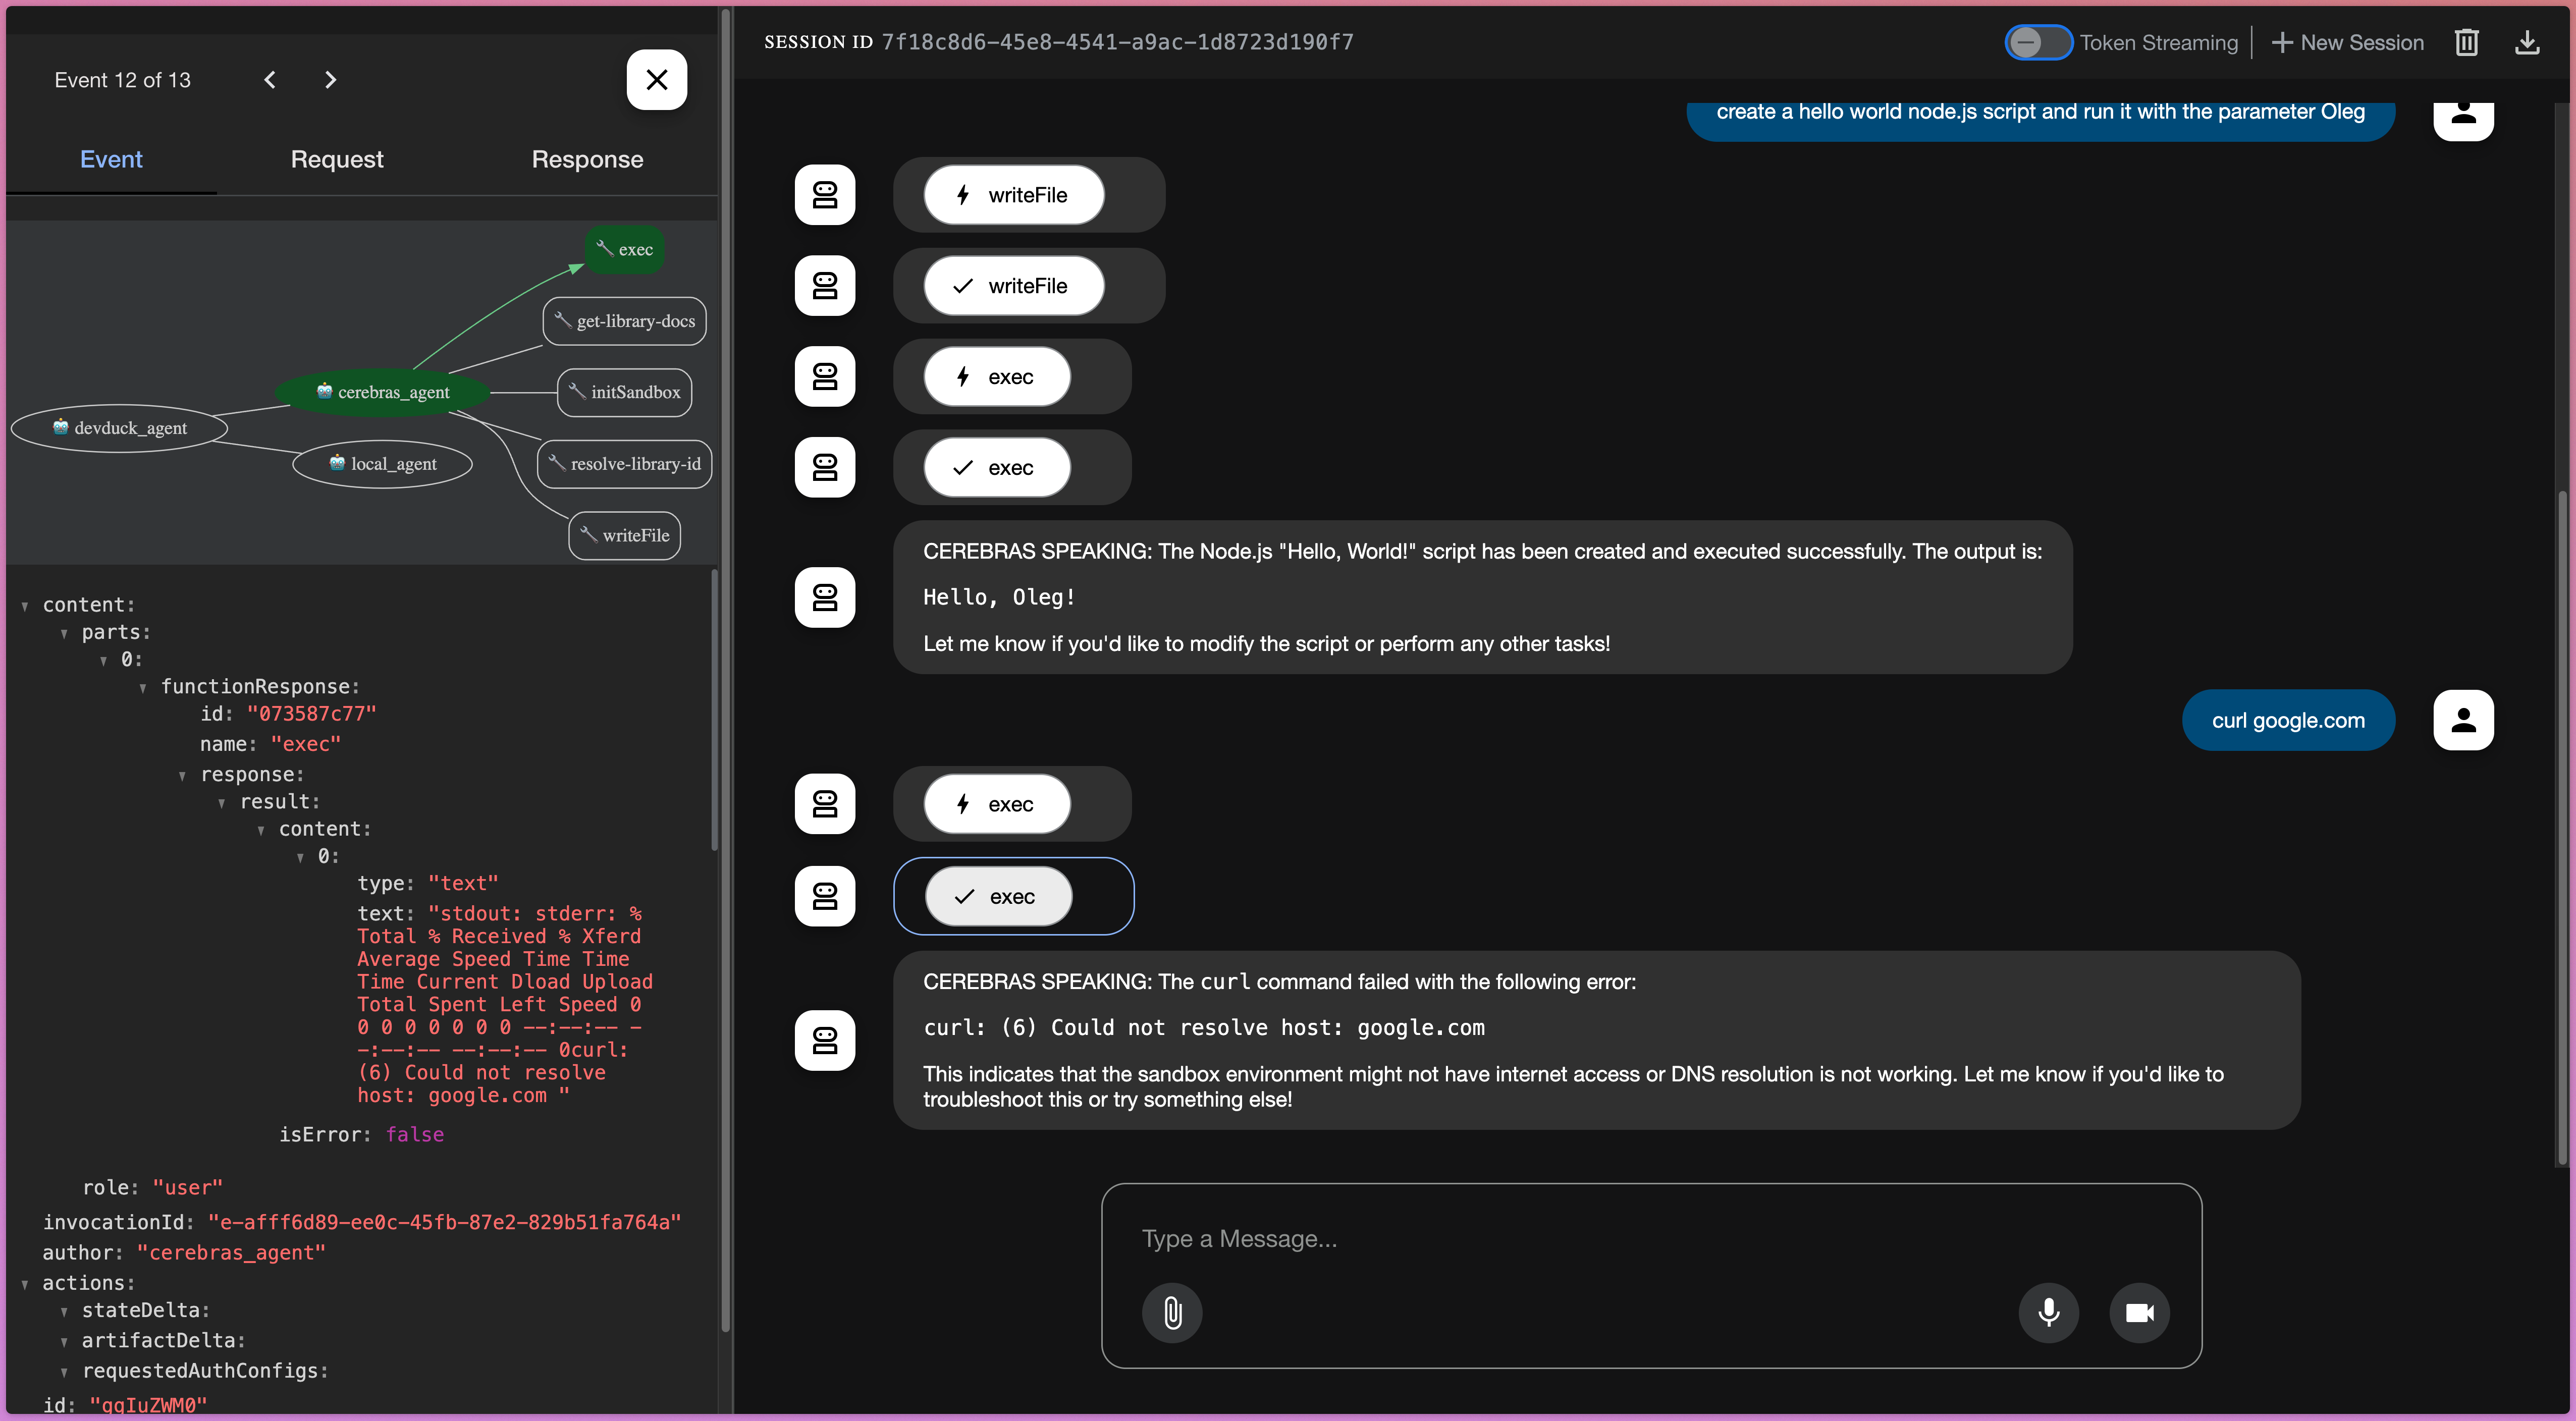
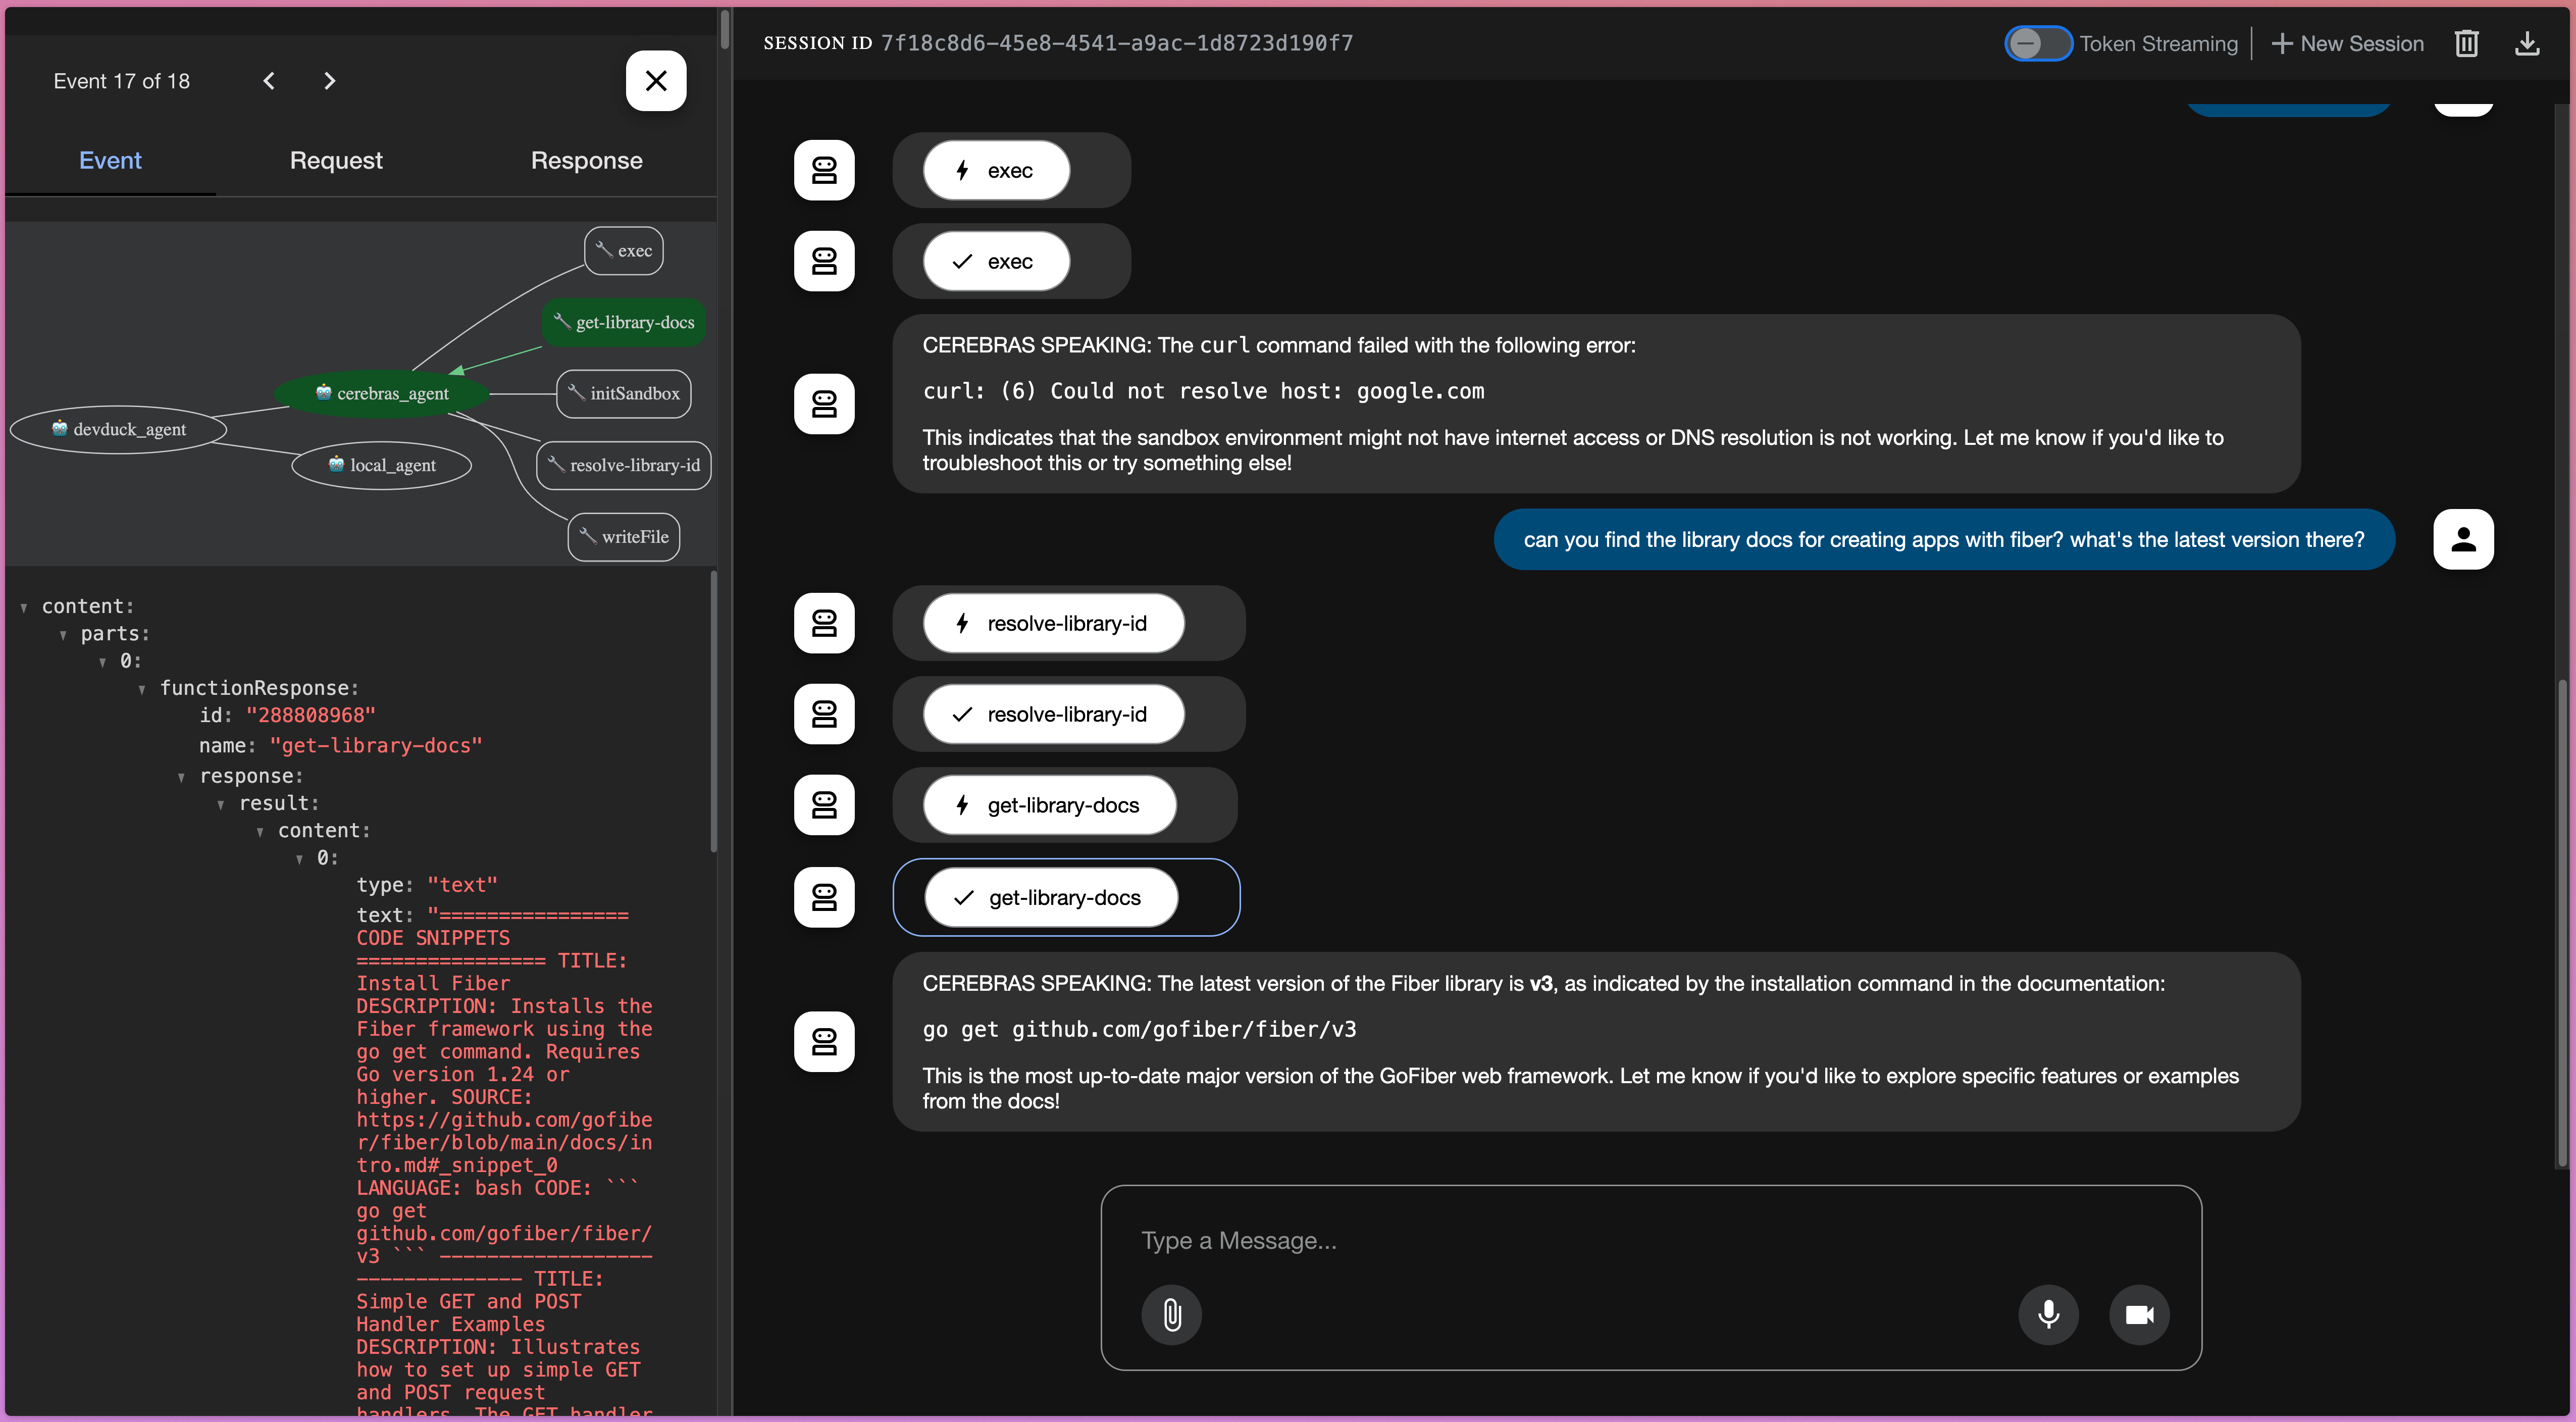
これは、きめ細かな制御という重要な利点を示しています。サンドボックスはネットワークから切り離されますが、他のツールは切り離されません。context7 MCP サーバーは引き続きインターネットにアクセスしてドキュメントを取得できるため、エージェントは実行環境のセキュリティを損なうことなく、より優れたコードを記述できます。
ああ、そして、きちんとした詳細は、compose によって管理されるコンテナを停止すると、サンドボックス MCP サーバーも強制終了し、通常のテスト実行後にクリーンアップするのと同じように、Testcontainers がすべてのサンドボックス コンテナをクリーンアップするようにトリガーされるということです。
次のステップと拡張性
このコーディングエージェントは出発点として最適ですが、本番環境に対応していません。実際のアプリケーションでは、npm レジストリなどのリソースへの制御されたアクセスを許可することができます。たとえば、ローカルの npm キャッシュをホストシステムからサンドボックスにマッピングすることで、これを実現できます。このようにして、開発者は、アクセス可能な npm ライブラリを正確に制御できます。
サンドボックスはカスタムMCPサーバーであるため、可能性は無限大です。自分で構築し、好きなように微調整し、必要なツールや制約を統合できます。
結論
この投稿では、Docker Compose と MCP Toolkit を使用して、安全でポータブルな AI コーディング エージェントを構築する方法を示しました。Testcontainers を使用してカスタム MCP サーバーを作成することで、エージェントの他のツールを制限することなく、ネットワーク アクセスの無効化などのきめ細かなセキュリティ制御を提供するサンドボックス実行環境を構築しました。このコーディングエージェントをCerebras APIに接続することで、驚異的な推論速度が得られます。このアーキテクチャは、独自の AI エージェントを構築するための強力で安全な基盤を提供します。リポジトリのクローンを作成して、コードを試してみることをお勧めします。おそらくすでに Dockerを持っていて 、 ここでCerebras APIキーにサインアップできます。
