これは、Python 開発をコンテナー化する方法に関する ブログ投稿シリーズの 第 2 部です。 パート 1 では、Python サービスをコンテナー化する方法とそのベスト プラクティスを既に示しました。 このパートでは、他のコンポーネントを設定してコンテナ化されたPythonサービスに接続する方法について説明します。 プロジェクト ファイルとデータを整理する優れた方法と、Docker Compose を使用してプロジェクト全体の構成を管理する方法を示します。 また、コンテナー化された開発プロセスを高速化するための Compose ファイルを作成するためのベスト プラクティスについても説明します。
Docker Composeを使用したプロジェクト構成の管理
例として、マイクロサービス アーキテクチャに従って機能を 3 層に分けるアプリケーションを取り上げましょう。 これは、マルチサービス アプリケーションではかなり一般的なアーキテクチャです。 サンプル アプリケーションは、次のもので構成されています。
- UI 層 – nginx サービスで実行される
- ロジック 層 – 私たちが焦点を当てているPythonコンポーネント
- データ 層 – MySQLデータベースを使用して、ロジック層に必要なデータを保存します

アプリケーションを階層に分割する理由は、プロジェクト全体を作り直すことなく、新しい階層を簡単に変更または追加できるためです。
プロジェクト ファイルを構造化する良い方法は、各サービスのファイルと構成を分離することです。 これは、プロジェクト内のサービスごとに専用のディレクトリを用意することで簡単に実行できます。 これは、コンポーネントを明確に表示し、各サービスを簡単にコンテナー化する場合に非常に便利です。 また、他のサービスファイルを誤って変更する可能性があることを心配することなく、サービス固有のファイルを操作するのに役立ちます。
サンプルアプリケーションには、次のディレクトリがあります。
プロジェクト
├─── ウェブ
└─── アプリ
└─── デシベル
Python コンポーネントをコンテナー化する方法については、このブログ投稿シリーズの最初の部分で既に説明しました。 同じことが他のプロジェクトコンポーネントにも当てはまりますが、ここで説明する構造を実装するサンプルに簡単にアクセスできるため、詳細は省略します。 awesome-compose リポジトリによって提供される nginx-flask-mysql の例はそれらの1つです。
これは、Dockerfile が配置された更新されたプロジェクト構造です。 Webコンポーネントとdbコンポーネントに同様の設定があるとします。
プロジェクト
├─── ウェブ
├─── アプリ
│ ├─── Dockerfile
│ ├─── 要件。txt
│ └─── src
│ └─── サーバー。py
└─── デシベル
これで、コンテナー化されたすべてのプロジェクト コンポーネントに対してコンテナーを手動で開始できるようになりました。 ただし、それらを通信させるには、ネットワークの作成を手動で処理し、コンテナをそれにアタッチする必要があります。 これはかなり複雑で、頻繁に行う必要がある場合は貴重な開発時間がかかります。
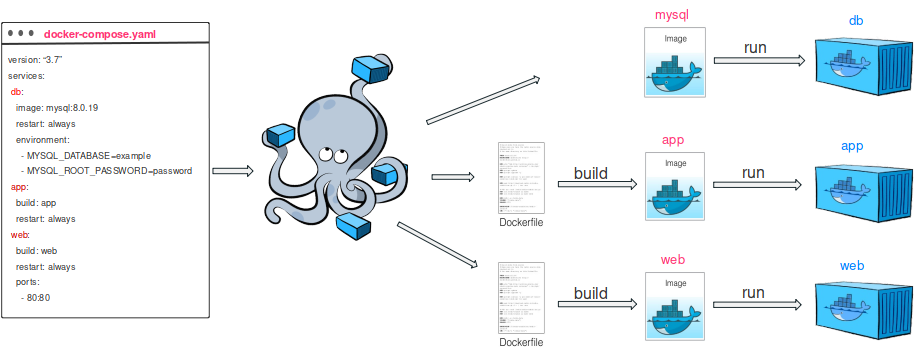
ここで、Docker Composeは、ローカル環境でコンテナを調整し、サービスをスピンアップおよび停止するための非常に簡単な方法を提供します。このために必要なのは、プロジェクトのサービスの構成を含むComposeファイルを作成することだけです。 それができたら、1つのコマンドでプロジェクトを実行できます。
ファイルの作成
Composeファイルの構造と、それを使用してプロジェクトサービスを管理する方法を見てみましょう。
以下は、プロジェクトのサンプルファイルです。 ご覧のとおり、サービスのリストを定義します。 dbセクションでは、適用する特定の構成がないため、基本イメージを直接指定します。 一方、私たちのWebおよびアプリサービスは、Dockerファイルからイメージを構築します。 サービスイメージを取得できる場所に応じて、ビルドフィールドまたはイメージフィールドを設定できます。 ビルド フィールドには、内部に Dockerfile を含むパスが必要です。
docker-compose.yaml
バージョン: "3.7」
サービス:
デシベル:
イメージ:mysql:8。0.19
コマンド: '–default-authentication-plugin=mysql_native_password'
再起動: 常に
環境:
– MYSQL_DATABASE=例
– MYSQL_ROOT_PASSWORD=パスワード
アプリ:
ビルド: アプリ
再起動: 常に
ウェブ:
ビルド: ウェブ
再起動: 常に
ポート:
– 80:80
データベースを初期化するには、環境変数をDB名とパスワードで渡すことができますが、Webサービスの場合は、プロジェクトのWebインターフェイスにアクセスできるようにコンテナポートをローカルホストにマップします。
Docker Composeを使用してプロジェクトをデプロイする方法を見てみましょう。
ここで行う必要があるのは、プロジェクトのルートディレクトリにdocker-compose.yamlを配置してから、docker-composeを使用してデプロイするためのコマンドを発行することだけです。
プロジェクト
├─── docker-composeを実行します。YAMLの
├─── ウェブ
├─── アプリ
└─── デシベル
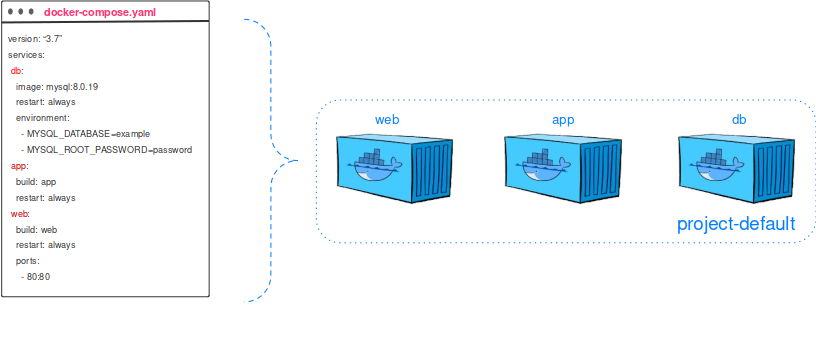
Docker Composeは、Docker Hubからmysqlイメージをプルしてdbコンテナを起動し、Webおよびアプリサービスの場合は、イメージをローカルでビルドしてから、それらからコンテナを実行します。また、デフォルトのネットワークを作成し、その中にすべてのコンテナを配置して、相互に到達できるようにします。

これはすべて、1つのコマンドでトリガーされます。
$ docker-compose up -d
デフォルトドライバでネットワーク「project_default」を作成する
db(mysql:8.0.19)をプルしています...
…
ステータス:mysqlの新しいイメージをダウンロードしました:8.0.19
アプリの構築
ステップ 1/6 : FROM python:3.8
—> 7f5b6ccd03e9
ステップ 2/6 : WORKDIR /code
—> キャッシュの使用
—> c347603a917d
ステップ 3/6 :コピー requirements.txt。
—> FA9A504E43AC
ステップ 4/6 :pip install -r requirements.txtを実行します
—>88adb193f0e で実行
Flask==1の収集 .1.1
…
正常にタグ付けされました project_app:latest
警告: サービス アプリのイメージは、まだ存在しないためビルドされました。 このイメージを再構築するには、 docker-compose build または docker-compose up --buildを使用する必要があります。
Web の構築
ステップ 1/3 :nginxから:1。13- アルパイン
1.13-アルパイン: ライブラリ/nginxからプル
…
ステータス:nginxの新しいイメージをダウンロードしました:1。13- アルパイン
—> ebe2c7c61055
ステップ 2/3 :nginx.conf / etc / nginx / nginx.confをコピーします
—> a3b2a7c8853c
ステップ 3/3 :コピー index.html/usr/share/nginx/html/index.html
—> 9071365fd6
65fd607139構築に成功しました
正常にタグ付けされました project_web:latest
project_web_1 を作成しています...完成です
project_db_1 を作成しています...完成です
project_app_1 を作成しています...完成です
実行中のコンテナーを確認します。
$ docker-compose ps
name コマンド ステート ポート
————————————————————————-
project_app_1 /bin/sh -c python server.py上
project_db_1 docker-entrypoint.sh –def .../tcp3306、/tcp33060
project_web_1 nginx -g デーモンオフ。 アップ0。0.0.0:80->80/tcp
すべてのプロジェクトコンテナを停止して削除するには、次のコマンドを実行します。
$ docker-composeダウン
停止project_db_1 ...完成です
停止project_web_1 ...完成です
停止project_app_1 ...完成です
project_db_1 を削除しています...完成です
project_web_1 を削除しています...完成です
project_app_1 を削除しています...完成です
ネットワーク project-default の削除
イメージをリビルドするには、ビルドを実行してからupコマンドを実行して、プロジェクトコンテナの状態を更新します。
$ docker-compose build
$ docker-compose up -d
ご覧のとおり、docker-composeを使用してプロジェクトコンテナのライフサイクルを管理するのは非常に簡単です。
作成ファイルを作成するためのベスト プラクティス
Composeファイルを分析して、Composeファイルを作成するためのベストプラクティスに従って最適化する方法を見てみましょう。
ネットワークの分離
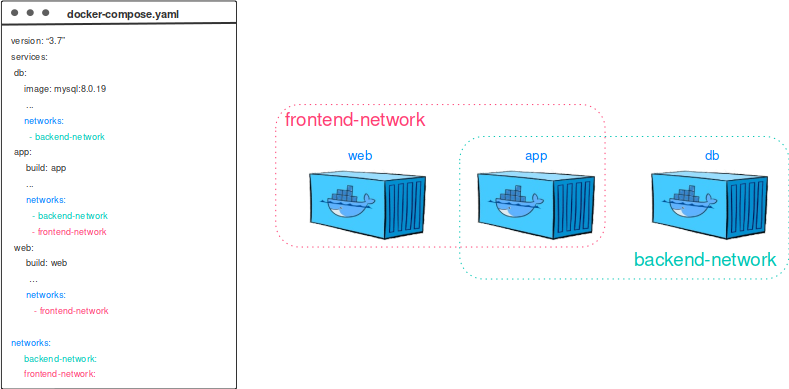
複数のコンテナがある場合は、それらを配線する方法を制御する必要があります。 作成ファイルにネットワークを設定しないため、すべてのコンテナが同じデフォルトネットワークで終了することを覚えておく必要があります。

Pythonサービスだけがデータベースに到達できるようにしたい場合、これは良いことではないかもしれません。 この問題に対処するために、作成ファイルで、コンポーネントのペアごとに個別のネットワークを実際に定義できます。 この場合、WebコンポーネントはDBにアクセスできません。

ドッカーボリューム
コンテナを削除するたびに、コンテナを削除するため、以前のセッションで保存したデータは失われます。 これを回避し、異なるコンテナ間でDBデータを保持するために、名前付きボリュームを利用できます。 このためには、以下に示すように、Composeファイルで名前付きボリュームを定義し、dbサービスでそのマウントポイントを指定するだけです。
バージョン: "3.7」
サービス:
デシベル:
イメージ:mysql:8。0.19
コマンド: '–default-authentication-plugin=mysql_native_password'
再起動: 常に
ボリューム:
– db-data:/var/lib/mysql
ネットワーク:
– バックエンドネットワーク
環境:
– MYSQL_DATABASE=例
– MYSQL_ROOT_PASSWORD=パスワード
アプリ:
ビルド: アプリ
再起動: 常に
ネットワーク:
– バックエンドネットワーク
– フロントエンドネットワーク
ウェブ:
ビルド: ウェブ
再起動: 常に
ポート:
– 80:80
ネットワーク:
– フロントエンドネットワーク
ボリューム:
db-data:
ネットワーク:
バックエンドネットワーク:
フロントエンドネットワーク:
必要に応じて、docker-compose downで名前付きボリュームを明示的に削除できます。
ドッカーシークレット
Compose ファイルでわかるように、パスワードは db プレーンテキストで設定しました。 これを回避するには、Dockerシークレットを悪用してパスワードを保存し、それを必要とするサービスと安全に共有します。 シークレットを定義し、サービスで参照するには、次のようにします。 パスワードはファイルにローカルproject/db/password.txtに保存され、 のコンテナ/run/secrets/<secret-name>にマウントされます。
バージョン: "3.7」
サービス:
デシベル:
イメージ:mysql:8。0.19
コマンド: '–default-authentication-plugin=mysql_native_password'
再起動: 常に
秘密:
– db-password (英語)
ボリューム:
– db-data:/var/lib/mysql
ネットワーク:
– バックエンドネットワーク
環境:
– MYSQL_DATABASE=例
– MYSQL_ROOT_PASSWORD_FILE=/run/secrets/db-password
アプリ:
ビルド: アプリ
再起動: 常に
秘密:
– db-password (英語)
ネットワーク:
– バックエンドネットワーク
– フロントエンドネットワーク
ウェブ:
ビルド: ウェブ
再起動: 常に
ポート:
・ 80:80
ネットワーク:
– フロントエンドネットワーク
ボリューム:
db-data:
秘密:
db-password:
ファイル: db/password.txt
ネットワーク:
バックエンドネットワーク:
フロントエンドネットワーク:
これで、ベストプラクティスに従ったプロジェクト用の明確に定義されたComposeファイルができました。 ここで説明したすべての側面を実行するサンプルアプリケーションを見つけることができます。
次は何ですか?
このブログ投稿では、Python サービスが他のサービスに配線されているコンテナー ベースのマルチサービス プロジェクトを設定する方法と、Docker Compose を使用してローカルにデプロイする方法について説明しました。
このシリーズの次の最終回では、コンテナ化された Python コンポーネントを更新およびデバッグする方法を示します。
リソース
- プロジェクトサンプル
- Docker Compose
- プロジェクト・スケルトンのサンプル


