The architecture of a container includes its application layer, data layer, and local storage within the containerized image. Data is critical to helping your apps run effectively and serving content to users.
Running containers also produce files that must exist beyond their own lifecycles. Occasionally, it’s necessary to share these files between your containers — since applications need continued access to things like user-generated content, database content, and log files. While you can use the underlying host filesystem, it’s better to use Docker volumes as persistent storage.
A Docker volume represents a directory on the underlying host, and is a standalone storage volume managed by the Docker runtime. One advantage of volumes is that you don’t have to specify a persistent storage location. This happens automatically within Docker and is hands-off. The primary purpose of Docker volumes is to provide named persistent storage across hosts and platforms.
This article covers how to leverage volumes, some quick Docker Desktop volume-management tips, and common use cases you may find helpful. Let’s jump in.
Working with Volumes
You can do the following to interact with Docker volumes:
- Specify the
-v (--volume)parameter in yourdocker runcommand. If the volume doesn’t exist yet, this creates it. - Include the
volumesparameter in a Docker Compose file. - Run
docker volume createto have more control in the creation step of a volume, after which you can mount it on one or more containers. - Run
docker volume lsto view the different Docker volumes available on a host. - Run
docker volume rm <volumename>to remove the persistent volume. - Run
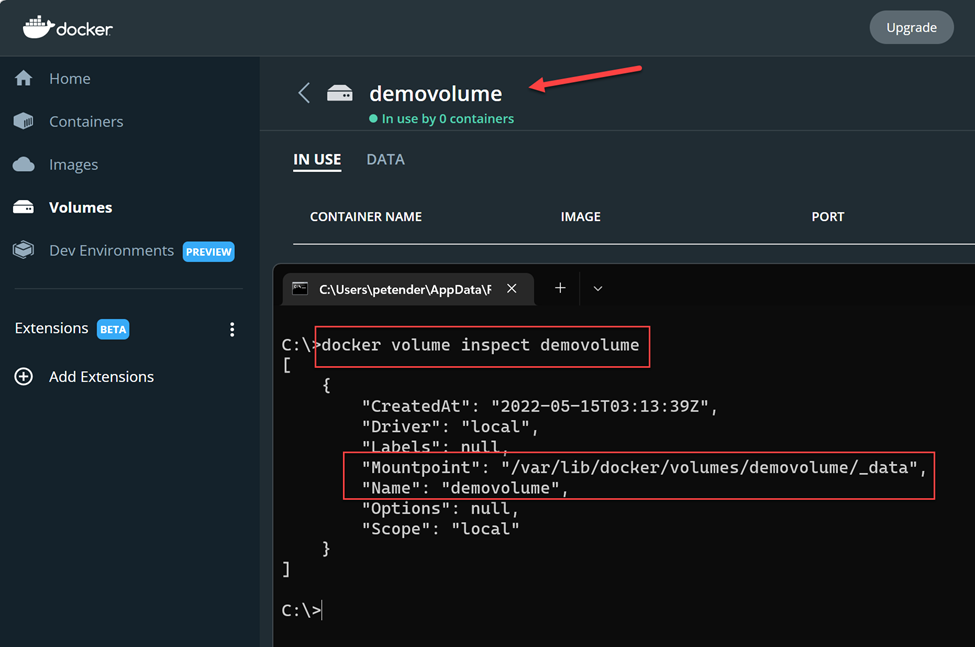
docker volume inspect <volumename>to view a volume’s configurations.
While the CLI is useful, you can also use Docker Desktop to easily create and manage volumes. Volume management has been one of the significant updates in Docker Desktop since v3.5, which we previously announced on our blog.
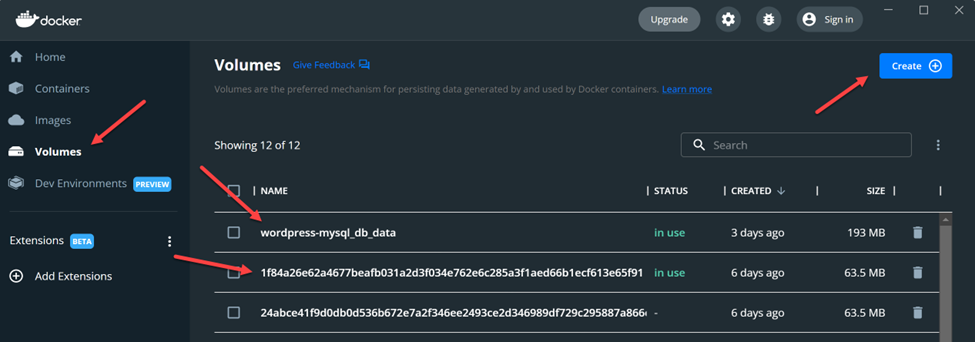
The following screenshots show the Volumes interface within Docker Desktop:

With Docker Desktop, you can do the following:
- Create new volumes with the click of a button.
- View important details about each volume (name, status, modification date, and size).
- Delete volumes as needed.
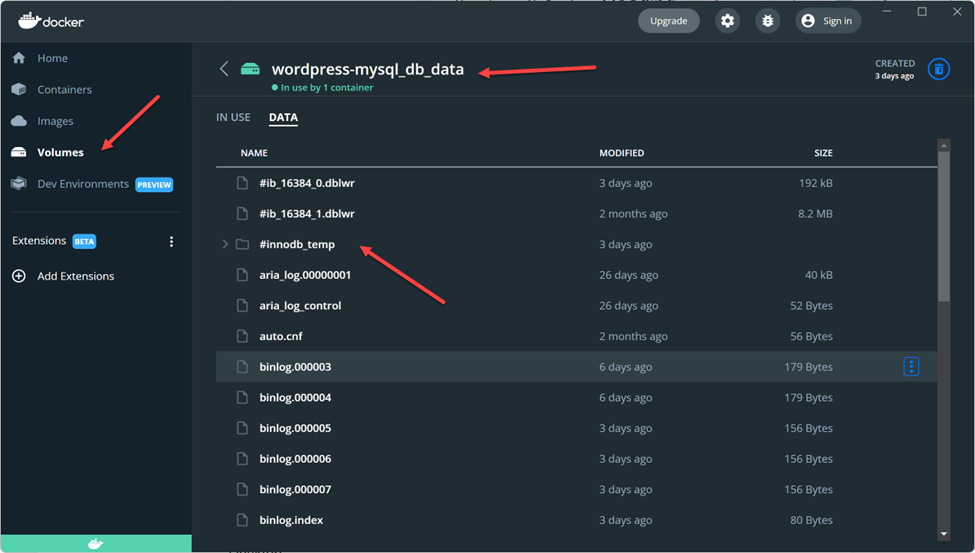
- Browse a volume’s contents directly through the interface.


Quick Tips for Easier Volume Management
Getting the most out of Docker Desktop means familiarizing yourself with some handy processes. Let’s explore some quick tips for managing Docker volumes.
Remove Unneeded Volumes to Save Space
Viewing each volume’s size within Docker Desktop is easy. Locate the size column and sort accordingly to view which volumes are consuming the most space. Volume removal isn’t automatic, so you need to manage this process yourself.
Simply find the volume you want to remove from your list, select it, and click either the trash can icon on the right or the red “Delete” button that appears above that list. This is great for saving local disk space. The process takes seconds, and Docker Desktop will save you from inadvertently removing active volumes — something best suited for the docker volume -f <volumename> command.
Leverage Batch Volume Selection
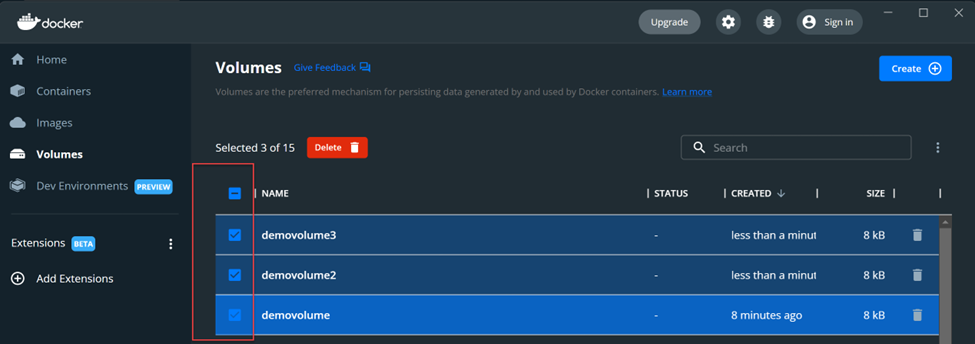
With Docker Desktop v4.7+, you can select multiple inactive volumes and delete them simultaneously. Alternatively, you can still use the docker volume prune CLI command to do this.
Ensure that your volumes are safe to delete, since they might contain crucial data. There’s currently no way to recover data from deleted or pruned volumes. It’s easier to erase critical application data while juggling multiple volumes, so exercise a little more caution with this CLI command.

Manage Data Within Volumes
You can also delete specific data within a volume or extract data from a volume (and save it) to use it externally. Use the three-dot menu to the right of a file item to delete or save your data. You can also easily view your volume’s collection of stored files in a familiar list format — helping you understand where important data and application dependencies reside.

Common and Clever Use Cases
Persisting Data with Named Volumes
The primary reason for using or switching to named volumes over bind mounts (which require you to manage the source location) is storage simplification. You might not care where your files are stored, and instead just need them reliably persisted across restarts.
And while you could once make a performance argument for named volumes on Linux or macOS, this is no longer the case following Docker Desktop’s v4.6 release.
There are a few other areas where named volumes are ideal, including:
- Larger, static dependency trees and libraries
- Database scenarios such as MySQL, MariaDB, and SQLite
- Log file preservation and adding caching directories
- Sharing files between different containers
Named volumes also give you a chance to semantically describe your storage, which is considered a best practice even if it’s not required. These identifiers can help you keep things organized — either visually, or more easily via CLI commands. After all, a specific name is much easier to remember than a randomized alphanumeric string (if you can remember those complex strings at all).
Better Testing and Security with Read-only Volumes
In most cases, you’ll want to provide a read and write storage endpoint for your running, containerized workloads. However, read-only volumes do have their perks. For example, you might have a test scenario where you want an application to access a data back end without overwriting the actual data.
Additionally, there might be a security scenario wherein read-only data volumes reduce tampering. While an attacker could gain access to your files, there’s nothing they could do to alter the filesystem.
You could even run into a niche scenario where you’re spinning up a server application — which requires read-write access — yet don’t need to persist your data between container runs. NGINX and Apache might particularly require write permissions for crucial PID or lock files. You can still leverage read-only volumes. Simply add the --tmpfs flag to denote a destination filesystem location.
Docker lets you define any volume as read-only using the :ro option, shown below:
docker run -v demovolume:/containerpath:ro my/demovolume
Tapping into Cloud Storage
Local storage is great, but your application may rely on cloud-based data sharing to run effectively. AWS and Azure are popular platforms, and it’s understandable that you’ll want to leverage them within your builds.
You can set up persistent cloud storage drivers, for Docker for AWS and Docker for Azure, using Docker’s Cloudstor plugin. This helps you get up and running with cloud-centric volumes after installation via the CLI. You can read more about setting up Cloudstor, and even starting a companion NGINX service, here.
What about shared object storage? You can also create volumes with a driver that supports writing files externally to NFS or Amazon S3. You can store your most important data in the cloud without grappling with application logic, saving time and effort.
Sharing Volumes Using Docker Compose
Since you can share Docker volumes among containers, they’re the perfect solution in a Docker Compose scenario. Each assigned container can have a volume parameter or you can share a volume among containers.
A Docker Compose file with volumes looks like this:
services:
db:
# We use a mariadb image which supports both amd64 &amp;amp;amp;amp;amp;amp;amp; arm64 architecture
#image: mariadb:10.6.4-focal
# If you really want to use MySQL, uncomment the following line
image: mysql:8.0.27
command: '--default-authentication-plugin=mysql_native_password'
volumes:
- db_data:/var/lib/mysql
restart: always
environment:
- MYSQL_ROOT_PASSWORD=P@55W.RD123
- MYSQL_DATABASE=wordpress
- MYSQL_USER=wordpress
- MYSQL_PASSWORD=P@55W.RD123
expose:
- 3306
- 33060
wordpress:
image: wordpress:latest
ports:
- 80:80
restart: always
environment:
- WORDPRESS_DB_HOST=db
- WORDPRESS_DB_USER=wordpress
- WORDPRESS_DB_PASSWORD=P@55W.RD123
- WORDPRESS_DB_NAME=wordpress
volumes:
db_data:
This code creates a volume named db_data and mounts it at /var/lib/mysql within the db container. When the MySQL container runs, it’ll store its files in this directory and persist them between container restarts.
Check out our documentation on using volumes to learn more about Docker volumes and how to manage them.
Conclusion
Docker volumes are convenient file-storage solutions for Docker container runtimes. They’re also the recommended way to concurrently share data among multiple containers. Given the fact that Docker volumes are persistent, they enable the storage and backup of critical data. They also enable storage centralization between containers.
We’ve also explored working with volumes, powerful use cases, and the volume-management benefits that Docker Desktop provides aside from the CLI.
Download Docker Desktop to get started with easier volume management. However, our volume management features (and use cases) are always evolving! To stay current with Docker Desktop’s latest releases, remember to bookmark our evolving changelog.
