Continuous Integration (CI) is a key element of cloud native application development. With containers forming the foundation of cloud-native architectures, developers need to integrate their version control system with a CI tool.
There’s a myth that continuous integration needs a cloud-based infrastructure. Even though CI makes sense for production releases, developers need to build and test the pipeline before they can share it with their team — or have the ability to perform the continuous integration (CI) on their laptop. Is that really possible today?
Introducing the Drone CI pipeline
An open-source project called Drone CI makes that a reality. With over 25,700 GitHub stars and 300-plus contributors, Drone is a cloud-native, self-service CI platform. Drone CI offers a mature, container-based system that leverages the scaling and fault-tolerance characteristics of cloud-native architectures. It helps you build container-friendly pipelines that are simple, decoupled, and declarative.
Drone is a container based pipeline engine that lets you run any existing containers as part of your pipeline or package your build logic into reusable containers called Drone Plugins.
Drone plugins are configurable based on the need and that allows distributing the container within your organization or to the community in general.
Running Drone CI pipelines from Docker Desktop
For a developer working with decentralized tools, the task of building and deploying microservice applications can be monumental. It’s tricky to install, manage, and use these apps in those environments. That’s where Docker Extensions come in. With Docker Extensions, developer tools are integrated right into Docker Desktop — giving you streamlined management workflows. It’s easier to optimize and transform your development processes.
The Drone CI extension for Docker Desktop brings CI to development machines. You can now import Drone CI pipelines into Docker Desktop and run them locally. You can also run specific steps of a pipeline, monitor execution results, and inspect logs.
Setting up a Drone CI pipeline
In this guide, you’ll learn how to set up a Drone CI pipeline from scratch on Docker Desktop.
First, you’ll install the Drone CI Extension within Docker Desktop. Second, you’ll learn how to discover Drone pipelines. Third, you’ll see how to open a Drone pipeline on Visual Studio Code. Lastly, you’ll discover how to run CI pipelines in trusted mode, which grants them elevated privileges on the host machine. Let’s jump in.
Prerequisites
You’ll need to download Docker Desktop 4.8 or later before getting started. Make sure to choose the correct version for your OS and then install it.
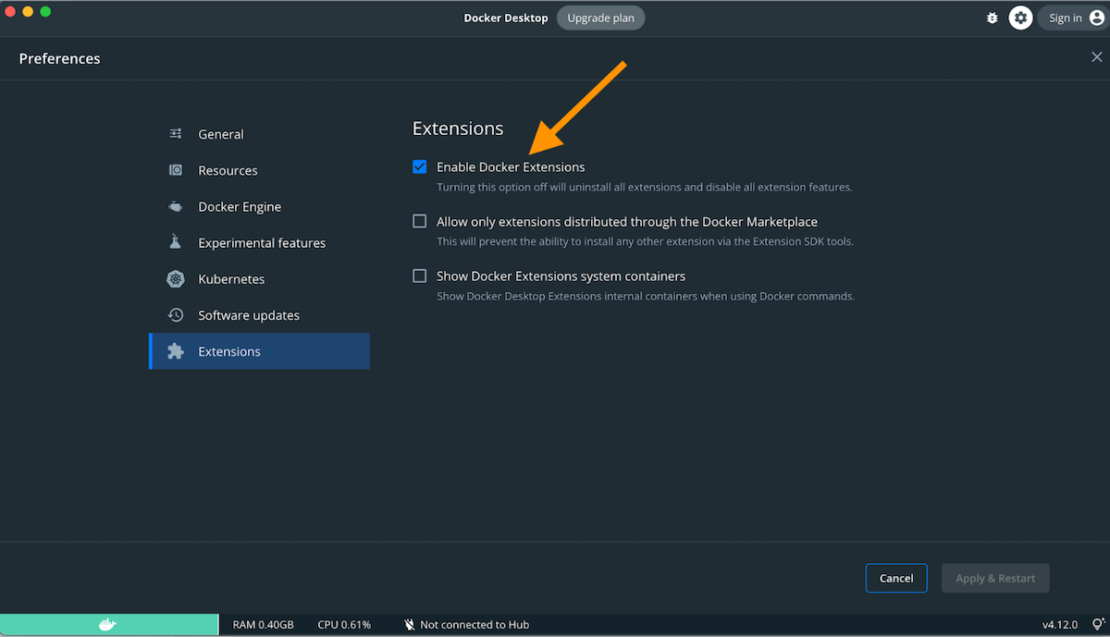
Next, hop into Docker Desktop and confirm that the Docker Extensions feature is enabled. Click the Settings gear > Extensions tab > check the “Enable Docker Extensions” box.
Installing the Drone CI Docker extension
Drone CI isn’t currently available on the Extensions Marketplace, so you’ll have to download it via the CLI. Launch your terminal and run the following command to install the Drone CI Extension:
docker extension install drone/drone-ci-docker-extension:latest
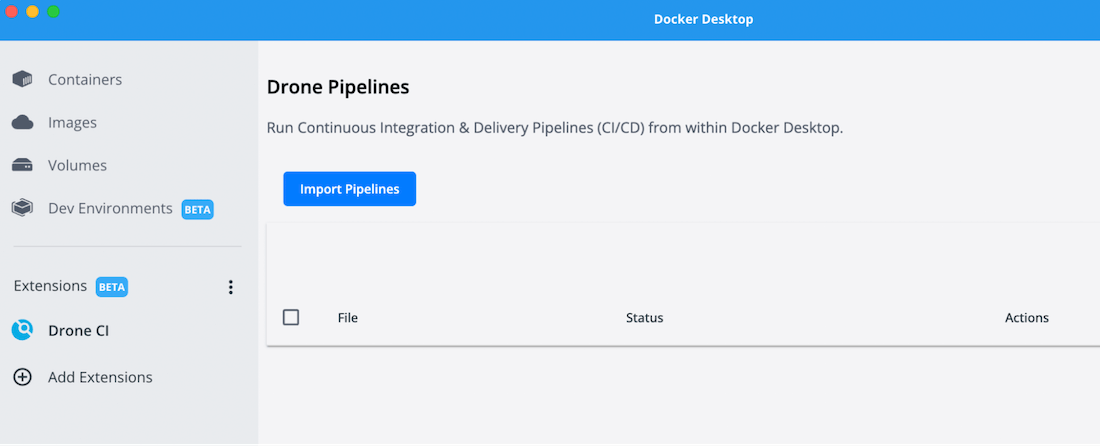
The Drone CI extension will soon appear in the Docker Dashboard’s left sidebar, underneath the Extensions heading:
Import Drone pipelines
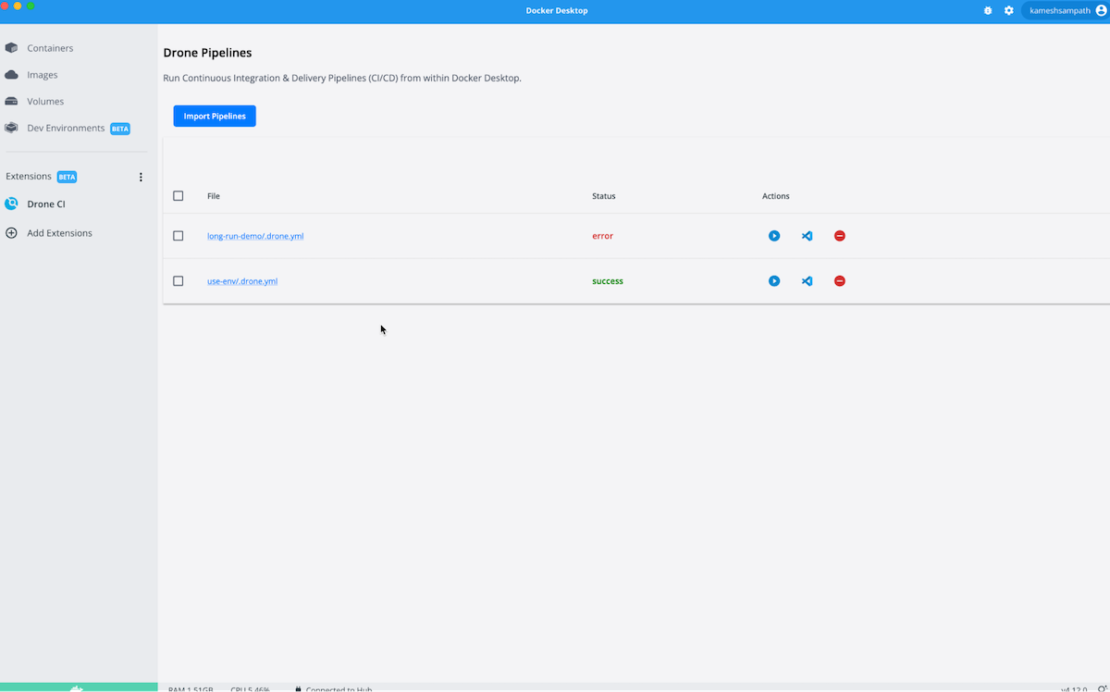
You can click the “Import Pipelines” option to specify the host filesystem path where your Drone CI pipelines (drone.yml files) are. If this is your first time with Drone CI pipelines, you can use the examples from our GitHub repo.
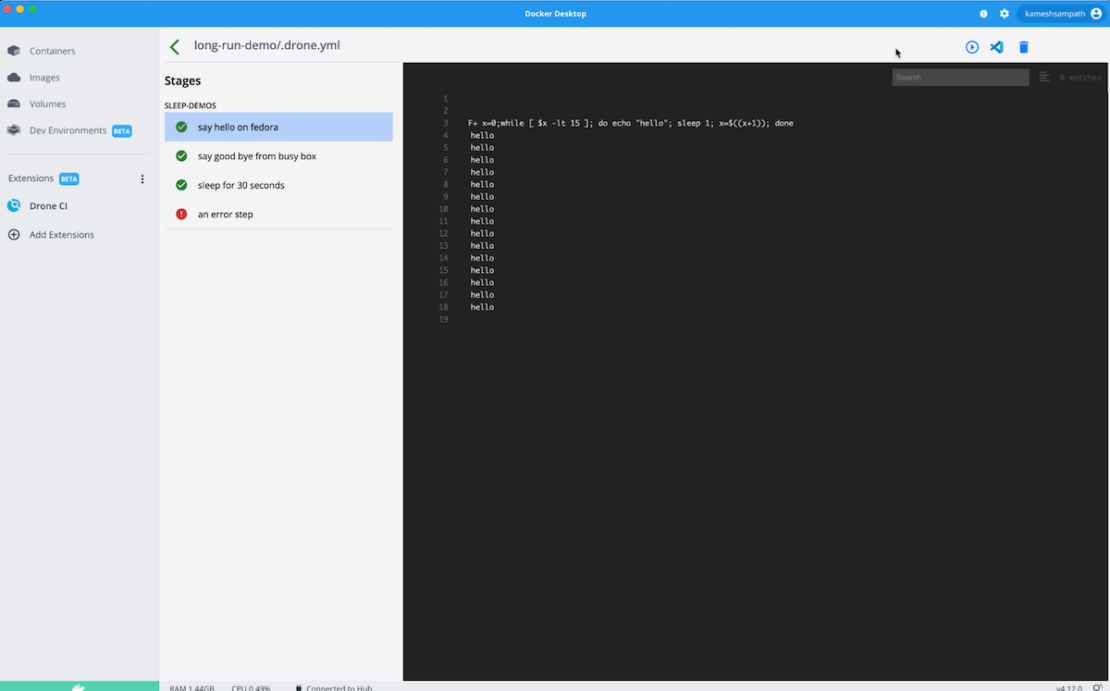
In the recording above, we’ve used the long-run-demo sample to run a local pipeline that executes a long running sleep command. This occurs within a Docker container.
kind: pipeline
type: docker
name: sleep-demos
steps:
  - name: sleep5
    image: busybox
    pull: if-not-exists
    commands:
    - x=0;while [ $x -lt 5 ]; do echo "hello"; sleep 1; x=$((x+1)); done
  - name: an error step
    image: busybox
    pull: if-not-exists
    commands:
    - yq --help
You can download this pipeline YAML file from the Drone CI GitHub page.
The file starts with a pipeline object that defines your CI pipeline. The type attribute defines your preferred runtime while executing that pipeline.
Drone supports numerous runners like docker, kubernetes, and more. The extension only supports docker pipelines currently.
Each pipeline step spins up a Docker container with the corresponding image defined as part of the step image attribute.
Each step defines an attribute called commands. This is a list of shell commands that we want to execute as part of the build. The defined list of commands will be converted into shell script and set as Docker container’s ENTRYPOINT. If any command (for example, the missing yq command, in this case) returns a non-zero exit code, the pipeline fails and exits.
Edit your pipeline faster in VS Code via Drone CI
Visual Studio Code (VS Code) is a lightweight, highly-popular IDE. It supports JavaScript, TypeScript, and Node.js. VS Code also has a rich extensions ecosystem for numerous other languages and runtimes.
Opening your Drone pipeline project in VS Code takes just seconds from within Docker Desktop:
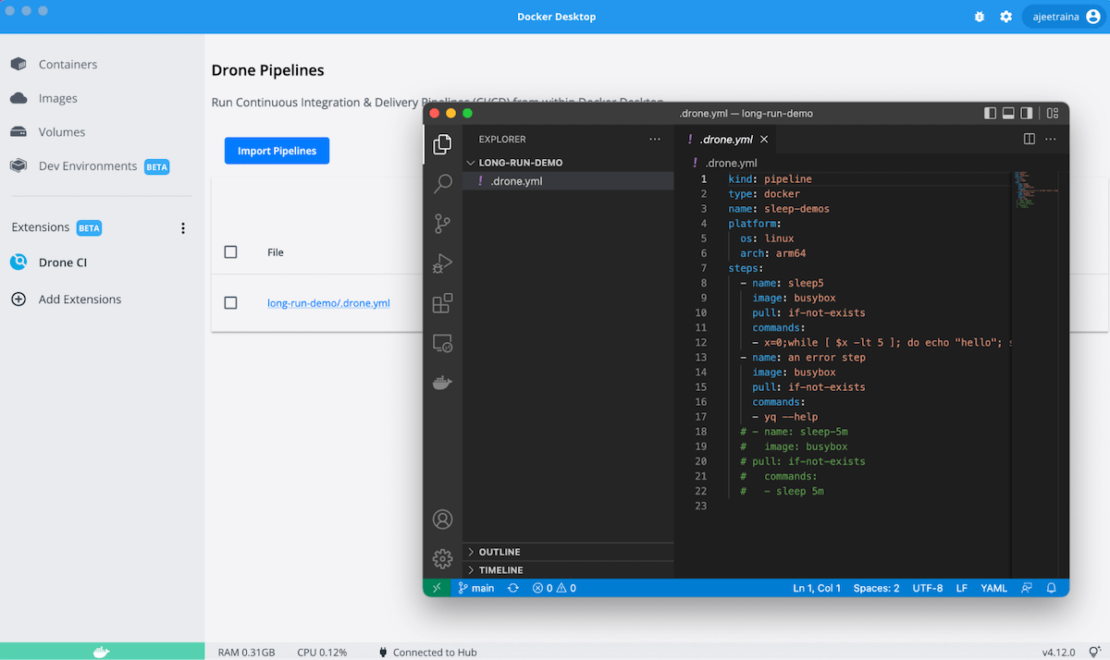
This feature helps you quickly view your pipeline and add, edit, or remove steps — then run them from Docker Desktop. It lets you iterate faster while testing new pipeline changes.
Running specific steps in the CI pipeline
The Drone CI Extension lets you run individual steps within the CI pipeline at any time. To better understand this functionality, let’s inspect the following Drone YAML file:
kind: pipeline
type: docker
name: sleep-demos
steps:
  - name: sleep5
    image: busybox
    pull: if-not-exists
    commands:
    - x=0;while [ $x -lt 5 ]; do echo "hello"; sleep 1; x=$((x+1)); done
  - name: an error step
    image: busybox
    pull: if-not-exists
    commands:
    - yq --help
In this example, the first pipeline step defined as sleep5 lets you execute a shell script (echo “hello”) for five seconds and then stop (ignoring an error step).The video below shows you how to run the specific sleep-demos stage within the pipeline:
Running steps in trusted mode
Sometimes, you’re required to run a CI pipeline with elevated privileges. These privileges enable a user to systematically do more than a standard user. This is similar to how we pass the --privileged=true parameter within a docker run command.
When you execute docker run --privileged, Docker will permit access to all host devices and set configurations in AppArmor or SELinux. These settings may grant the container nearly equal access to the host as processes running outside containers on the host.
Drone’s trusted mode tells your container runtime to run the pipeline containers with elevated privileges on the host machine. Among other things, trusted mode can help you:
- Mount the Docker host socket onto the pipeline container
- Mount the host path to the Docker container
Run pipelines using environment variable files
The Drone CI Extension lets you define environment variables for individual build steps. You can set these within a pipeline step. Like docker run provides a way to pass environment variables to running containers, Drone lets you pass usable environment variables to your build. Consider the following Drone YAML file:
kind: pipeline
type: docker
name: default
steps:
  - name: display environment variables
    image: busybox
    pull: if-not-exists
    commands:
    - printenv
The file starts with a pipeline object that defines your CI pipeline. The type attribute defines your preferred runtime (Docker, in our case) while executing that pipeline. The platform section helps configure the target OS and architecture (like arm64) and routes the pipeline to the appropriate runner. If unspecified, the system defaults to Linux amd64.
The steps section defines a series of shell commands. These commands run within a busybox Docker container as the ENTRYPOINT. As shown, the command prints the environment variables if you’ve declared the following environment variables in your my-env file:
DRONE_DESKTOP_FOO=foo
DRONE_DESKTOP_BAR=bar
You can choose your preferred environment file and run the CI pipeline (pictured below):
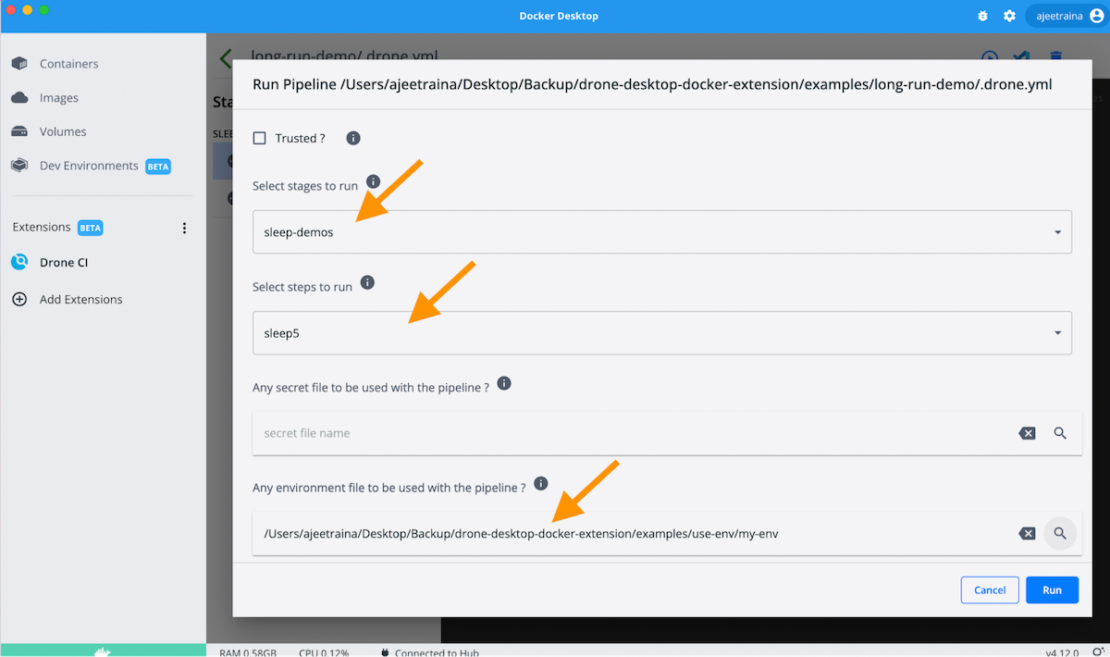
If you try importing the CI pipeline, you can print every environment variable.
Run pipelines with secrets files
We use repository secrets to store and manage sensitive information like passwords, tokens, and ssh keys. Storing this information as a secret is considered safer than storing it within a plain text configuration file.
Note: Drone masks all values used from secrets while printing them to standard output and error.
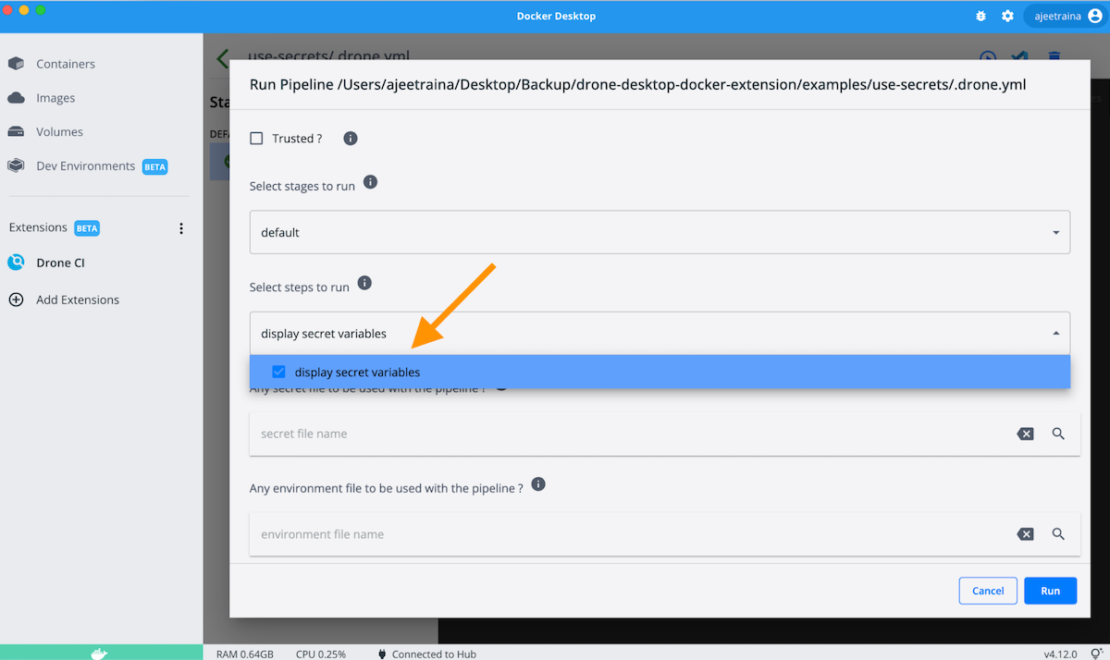
The Drone CI Extension lets you choose your preferred secrets file and use it within your CI pipeline as shown below:
Remove pipelines
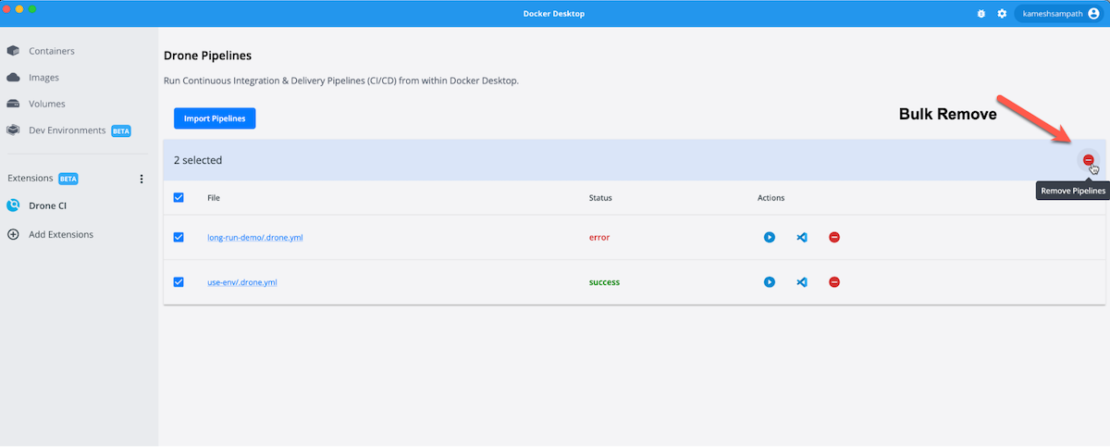
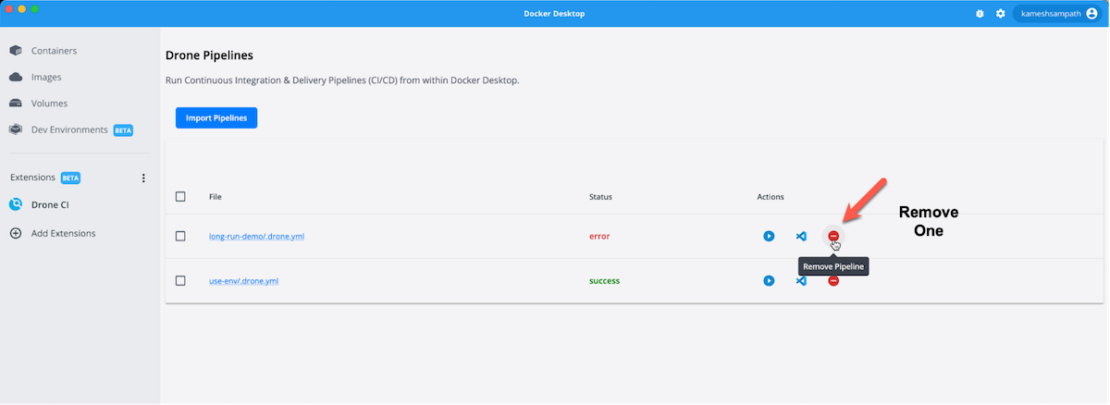
You can remove a CI pipeline in just one step. Select one or more Drone pipelines and remove them by clicking the red minus (“-”) button on the right side of the Dashboard. This action will only remove the pipelines from Docker Desktop — without deleting them from your filesystem.
Bulk remove all pipelines
Remove a single pipeline
Conclusion
Drone is a modern, powerful, container-friendly CI that empowers busy development teams to automate their workflows. This dramatically shortens building, testing, and release cycles. With a Drone server, development teams can build and deploy cloud apps. These harness the scaling and fault-tolerance characteristics of cloud-native architectures like Kubernetes.
Check out Drone’s documentation to get started with CI on your machine. With the Drone CI extension, developers can now run their Drone CI pipelines locally as they would in their CI systems.
Want to dive deeper into Docker Extensions? Check out our intro documentation, or discover how to build your own extensions.

