In today’s fast-paced world of software development, product teams are expected to move quickly: building features, shipping updates, and reacting to user needs in real-time. But moving fast should never mean compromising on quality or security.
Thanks to modern tooling, developers can now maintain high standards while accelerating delivery. In a previous article, we explored how Testcontainers supports shift-left testing by enabling fast and reliable integration tests within the inner dev loop. In this post, we’ll look at the security side of this approach and how Docker can help move security earlier in the development lifecycle, using practical examples.
Testing a Movie Catalog API with Security Built In
We’ll use a simple demo project to walk through our workflow. This is a Node.js + TypeScript API backed by PostgreSQL and tested with Testcontainers.
Movie API Endpoints:
|
Method |
Endpoint |
Description |
|
|---|---|---|---|
|
POST |
/movies |
Add a new movie to the catalog |
|
|
GET |
/movies |
Retrieve all movies, sorted by title |
|
|
GET |
/movies/search?q=… |
Search movies by title or description (fuzzy match) |
Before deploying this app to production, we want to make sure it functions correctly and is free from critical vulnerabilities.
Testing Code with Testcontainers: Recap
We verify the application against a real PostgreSQL instance by using Testcontainers to spin up containers for both the database and the application. A key advantage of Testcontainers is that it creates these containers dynamically during test execution. Another feature of the Testcontainers libraries is the ability to start containers directly from a Dockerfile. This allows us to run the containerized application along with any required services, such as databases, effectively reproducing the local environment needed to test the application at the API or end-to-end (E2E) level. This approach provides an additional layer of quality assurance, bringing even more testing into the inner development loop.
For a more detailed explanation of how Testcontainers enables proactive testing approach into the developer inner loop, refer to the introductory blog post.
Here’s a beforeAll setup that prepares our test environment, including PostgreSQL and the application under development, started from the Dockerfile :
beforeAll(async () => {
     const network = await new Network().start();
     // 1. Start Postgres
     db = await new PostgreSqlContainer("postgres:17.4")
     .withNetwork(network)
     .withNetworkAliases("postgres")
     .withDatabase("catalog")
     .withUsername("postgres")
     .withPassword("postgres")
     .withCopyFilesToContainer([
       {
         source: path.join(__dirname, "../dev/db/1-create-schema.sql"),
         target: "/docker-entrypoint-initdb.d/1-create-schema.sql"
       },
     ])
     .start();
     // 2.  Build movie catalog API container from the Dockerfile
     const container = await GenericContainer
       .fromDockerfile("../movie-catalog")
       .withTarget("final")
       .withBuildkit()
       .build();
    // 3. Start movie catalog API container with environment variables for DB connection
     app = await container
       .withNetwork(network)
       .withExposedPorts(3000)
       .withEnvironment({
           PGHOST: "postgres",
           PGPORT: "5432",
           PGDATABASE: "catalog",
           PGUSER: "postgres",
           PGPASSWORD: "postgres",
         })
       .withWaitStrategy(Wait.forListeningPorts())
       .start();
   }, 120000);
We can now test the movie catalog API:
it("should create and retrieve a movie", async () => {
     const baseUrl = `http://${app.getHost()}:${app.getMappedPort(3000)}`;
     const payload = {
       title: "Interstellar",
       director: "Christopher Nolan",
       genres: ["sci-fi"],
       releaseYear: 2014,
       description: "Space and time exploration"
     };

     const response = await axios.post(`${baseUrl}/movies`, payload);
     expect(response.status).toBe(201);
     expect(response.data.title).toBe("Interstellar");
   }, 120000);
This approach allows us to validate that:
- The application is properly containerized and starts successfully.
- The API behaves correctly in a containerized environment with a real database.
However, that’s just one part of the quality story. Now, let’s turn our attention to the security aspects of the application under development.
Introducing Docker Scout and Docker Hardened Images
To follow modern best practices, we want to containerize the app and eventually deploy it to production. Before doing so, we must ensure the image is secure by using Docker Scout.
Our Dockerfile takes a multi-stage build approach and is based on the node:22-slim image.
###########################################################
# Stage: base
# This stage serves as the base for all of the other stages.
# By using this stage, it provides a consistent base for both
# the dev and prod versions of the image.
###########################################################
FROM node:22-slim AS base
WORKDIR /usr/local/app
RUN useradd -m appuser && chown -R appuser /usr/local/app
USER appuser
COPY --chown=appuser:appuser package.json package-lock.json ./

###########################################################
# Stage: dev
# This stage is used to run the application in a development
# environment. It installs all app dependencies and will
# start the app in a dev mode that will watch for file changes
# and automatically restart the app.
###########################################################
FROM base AS dev
ENV NODE_ENV=development
RUN npm ci --ignore-scripts
COPY --chown=appuser:appuser ./src ./src
EXPOSE 3000
CMD ["npx", "nodemon", "src/app.js"]

###########################################################
# Stage: final
# This stage serves as the final image for production. It
# installs only the production dependencies.
###########################################################
# Deps: install only prod deps
FROM base AS prod-deps
ENV NODE_ENV=production
RUN npm ci --production --ignore-scripts && npm cache clean --force
# Final: clean prod image
FROM base AS final
WORKDIR /usr/local/app
COPY --from=prod-deps /usr/local/app/node_modules ./node_modules
COPY ./src ./src
EXPOSE 3000
CMD [ "node", "src/app.js" ]
Let’s build our image with SBOM and provenance metadata. First, make sure that the containerd image store is enabled in Docker Desktop. We’ll also use the buildx command ( a Docker CLI plugin that extends the docker build) with the –provenance=true and –sbom=true flags. These options attach build attestations to the image, which Docker Scout uses to provide more detailed and accurate security analysis.
docker buildx build --provenance=true --sbom=true -t movie-catalog-service:v1 .
Then set up a Docker organization with security policies and scan the image with Docker Scout:
docker scout config organization demonstrationorg
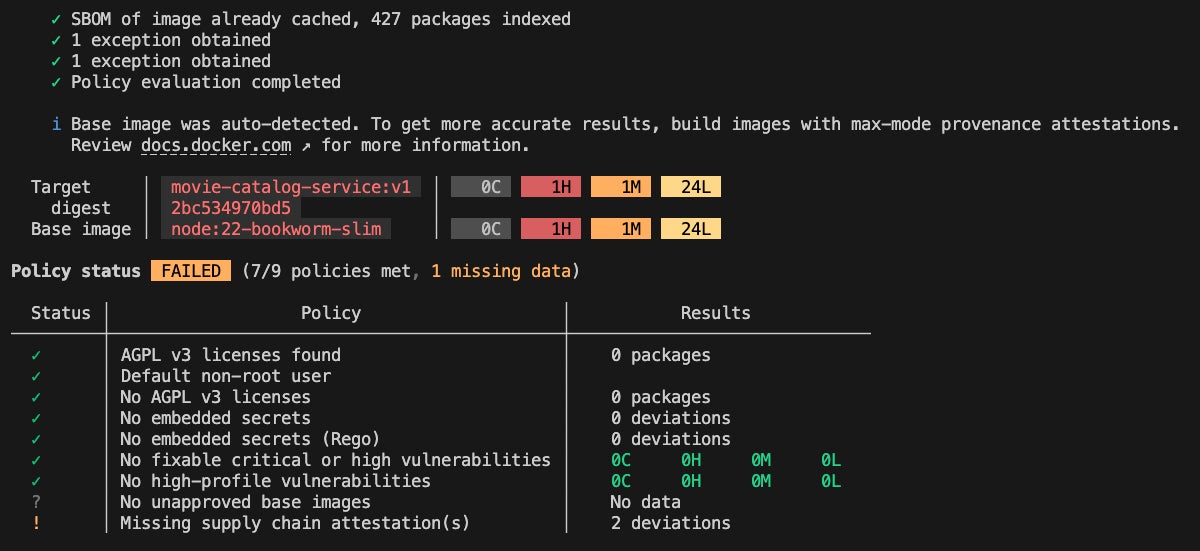
docker scout quickview movie-catalog-service:v1

Figure 1: Docker Scout cli quickview output for node:22 based movie-catalog-service image
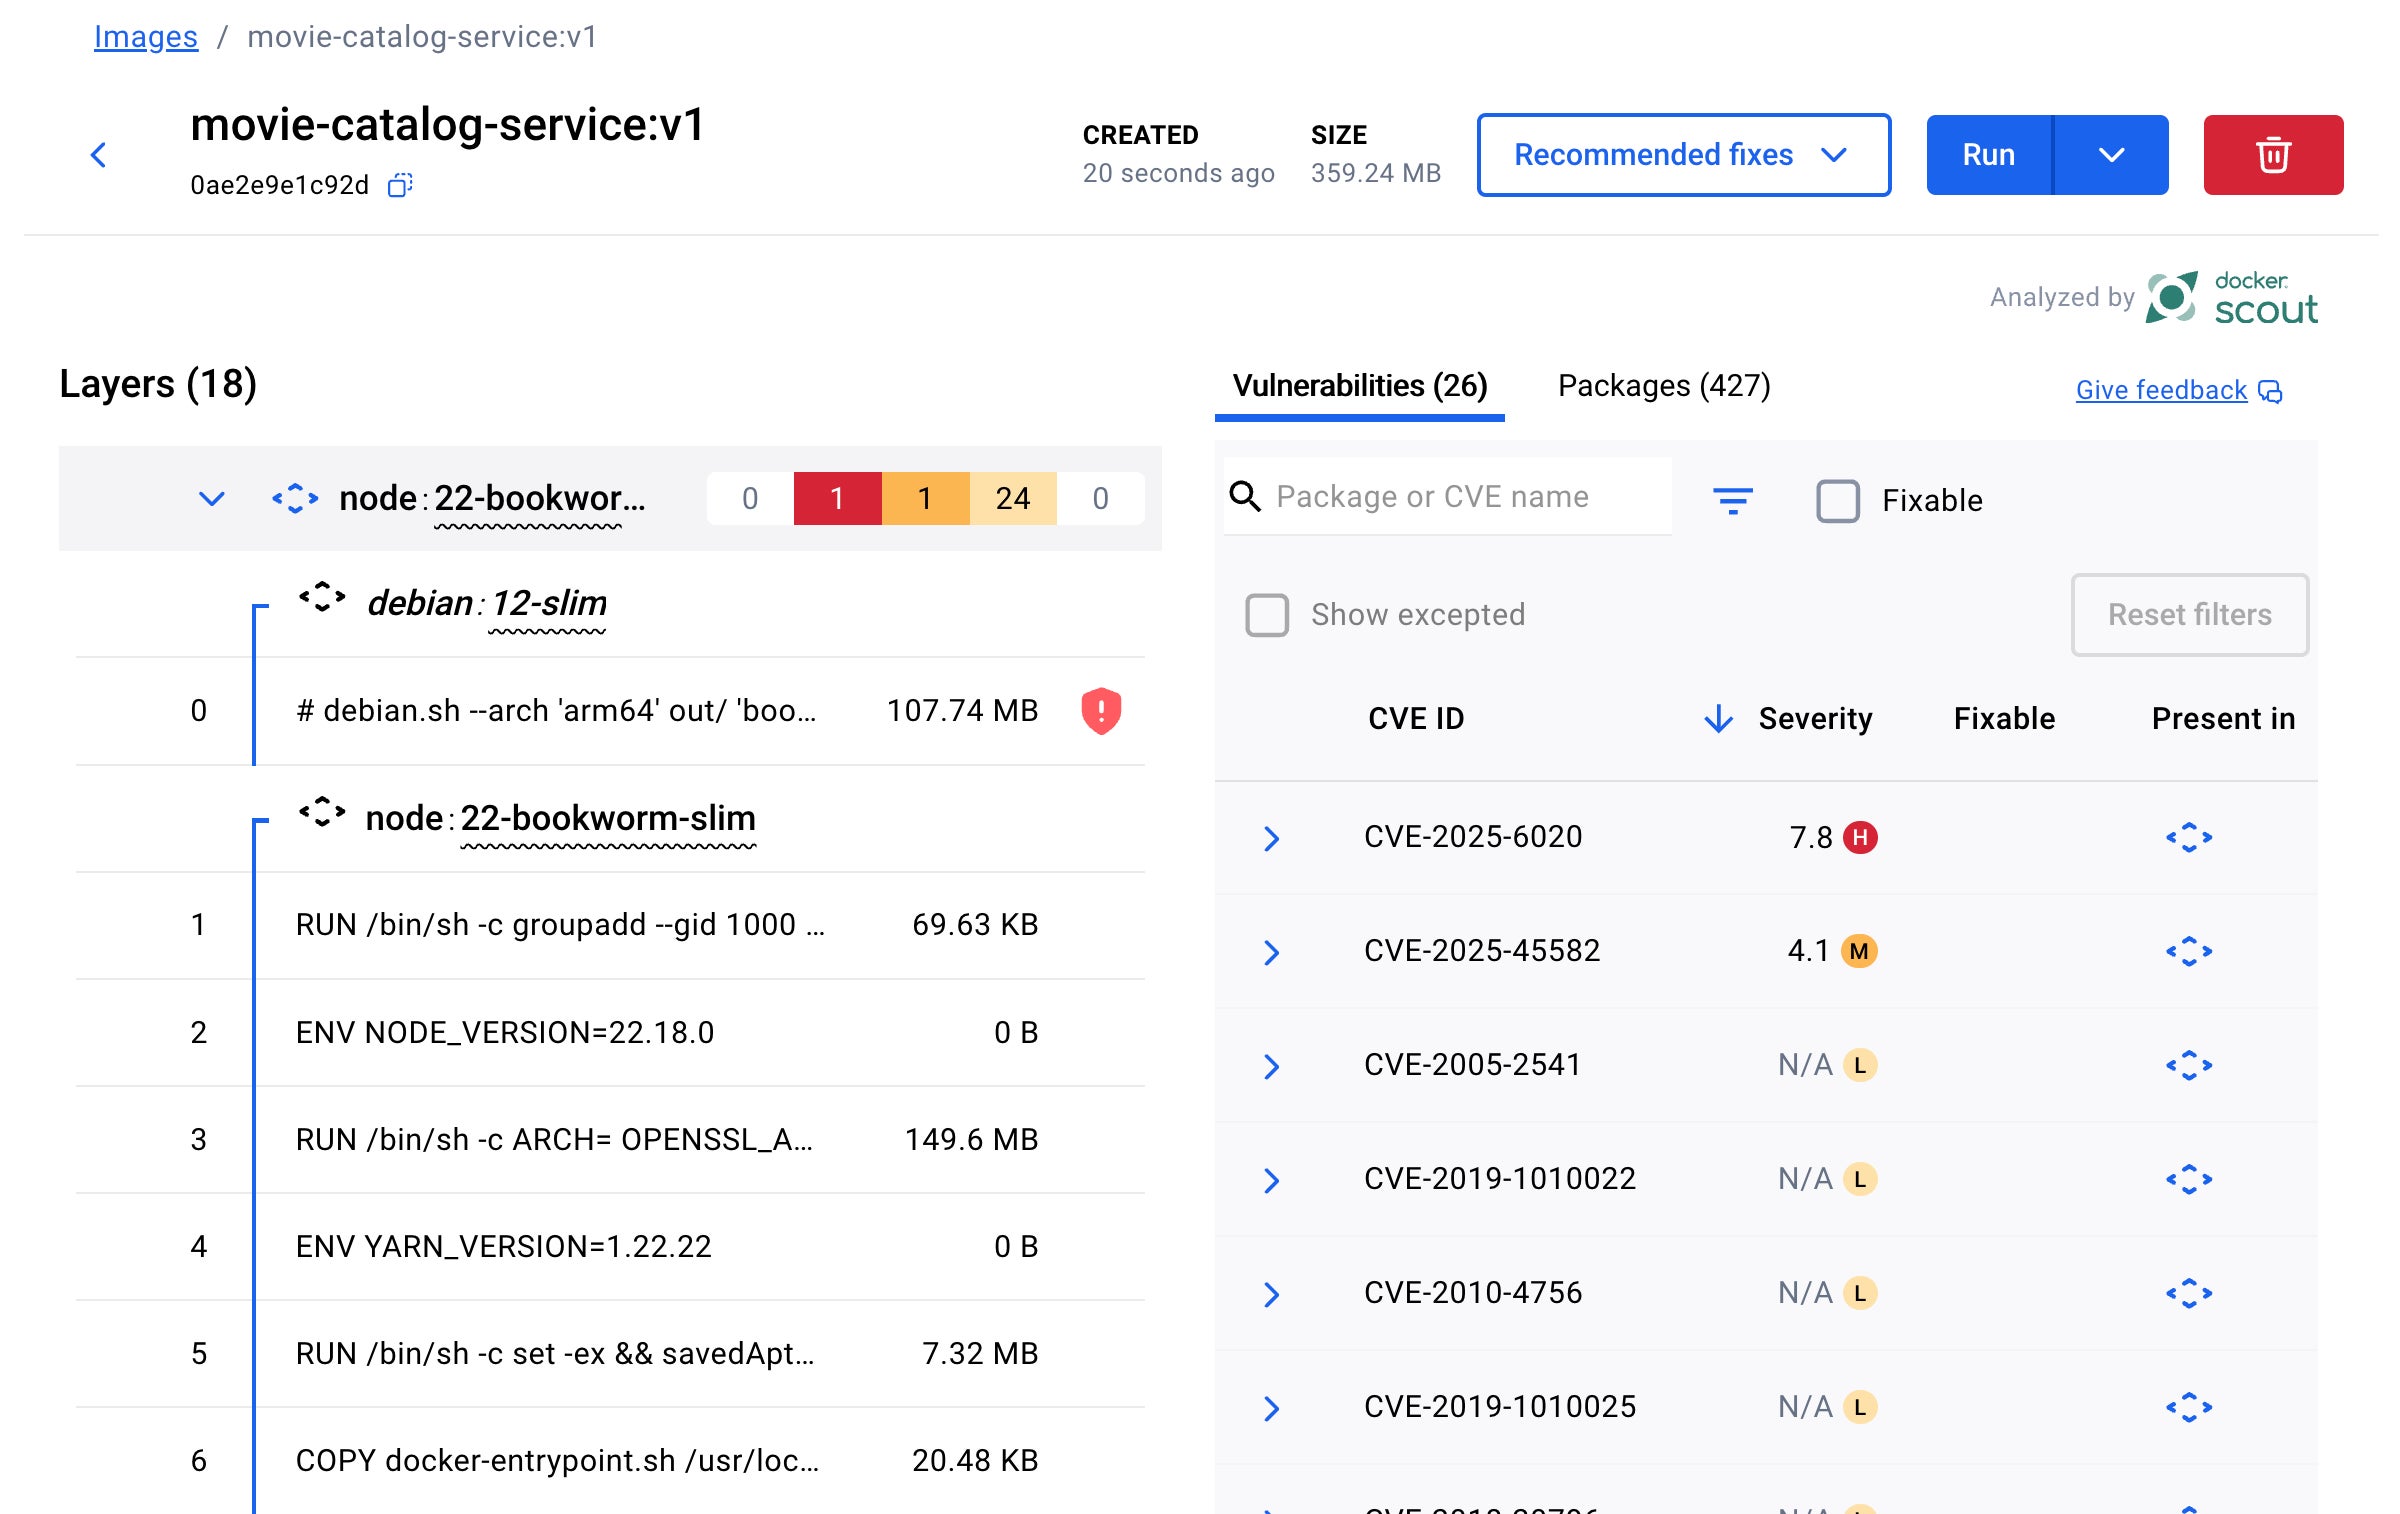
Docker Scout also offers a visual analysis via Docker Desktop.

Figure 2: Image layers and CVEs view in Docker Desktop for node:22 based movie-catalog-service image
In this example, no vulnerabilities were found in the application layer. However, several CVEs were introduced by the base node:22-slim image, including a high-severity CVE-2025-6020, a vulnerability present in Debian 12. This means that any Node.js image based on Debian 12 inherits this vulnerability. A common way to address this is by switching to an Alpine-based Node image, which does not include this CVE. However, Alpine uses musl libc instead of glibc, which can lead to compatibility issues depending on your application’s runtime requirements and deployment environment.
So, what’s a more secure and compatible alternative?
That’s where Docker Hardened Images (DHI) come in. These images follow a distroless philosophy, removing unnecessary components to significantly reduce the attack surface. The result? Smaller images that pull faster, run leaner, and provide a secure-by-default foundation for production workloads:
- Near-zero exploitable CVEs: Continuously updated, vulnerability-scanned, and published with signed attestations to minimize patch fatigue and eliminate false positives.
- Seamless migration: Drop-in replacements for popular base images, with -dev variants available for multi-stage builds.
- Up to 95% smaller attack surface: Unlike traditional base images that include full OS stacks with shells and package managers, distroless images retain only the essentials needed to run your app.
- Built-in supply chain security: Each image includes signed SBOMs, VEX documents, and SLSA provenance for audit-ready pipelines.
For developers, DHI means fewer CVE-related disruptions, faster CI/CD pipelines, and trusted images you can use with confidence.
Making the Switch to Docker Hardened Images
Switching to a Docker Hardened Image is straightforward. All we need to do is replace the base image node:22-slim with a DHI equivalent.
Docker Hardened Images come in two variants:
- Dev variant (demonstrationorg/dhi-node:22-dev) – includes a shell and package managers, making it suitable for building and testing.
- Runtime variant (demonstrationorg/dhi-node:22) – stripped down to only the essentials, providing a minimal and secure footprint for production.
This makes them perfect for use in multi-stage Dockerfiles. We can build the app in the dev image, then copy the built application into the runtime image, which will serve as the base for production.
Here’s what the updated Dockerfile would look like:
###########################################################
# Stage: base
# This stage serves as the base for all of the other stages.
# By using this stage, it provides a consistent base for both
# the dev and prod versions of the image.
###########################################################
# Changed node:22 to dhi-node:22-dev
FROM demonstrationorg/dhi-node:22-dev AS base
WORKDIR /usr/local/app
# DHI comes with nonroot user built-in.
COPY --chown=nonroot package.json package-lock.json ./

###########################################################
# Stage: dev
# This stage is used to run the application in a development
# environment. It installs all app dependencies and will
# start the app in a dev mode that will watch for file changes
# and automatically restart the app.
###########################################################
FROM base AS dev
ENV NODE_ENV=development
RUN npm ci --ignore-scripts
# DHI comes with nonroot user built-in.
COPY --chown=nonroot ./src ./src
EXPOSE 3000
CMD ["npx", "nodemon", "src/app.js"]

###########################################################
# Stage: final
# This stage serves as the final image for production. It
# installs only the production dependencies.
###########################################################
# Deps: install only prod deps
FROM base AS prod-deps
ENV NODE_ENV=production
RUN npm ci --production --ignore-scripts && npm cache clean --force
# Final: clean prod image
# Changed base to dhi-node:22
FROM demonstrationorg/dhi-node:22 AS final
WORKDIR /usr/local/app
COPY --from=prod-deps /usr/local/app/node_modules ./node_modules
COPY ./src ./src
EXPOSE 3000
CMD [ "node", "src/app.js" ]
Let’s rebuild and scan the new image:
docker buildx build --provenance=true --sbom=true -t movie-catalog-service-dhi:v1 .
docker scout quickview movie-catalog-service-dhi:v1

Figure 3: Docker Scout cli quickview output for dhi-node:22 based movie-catalog-service image
As you can see, all critical and high CVEs are gone, thanks to the clean and minimal footprint of the Docker Hardened Image.
One of the key benefits of using DHI is the security SLA it provides. If a new CVE is discovered, the DHI team commits to resolving:
- Critical and high vulnerabilities within 7 days of a patch becoming available,
- Medium and low vulnerabilities within 30 days.
This means you can significantly reduce your CVE remediation burden and give developers more time to focus on innovation and feature development instead of chasing vulnerabilities.
Comparing images with Docker Scout
Let’s also look at the image size and package count advantages of using distroless Hardened Images.
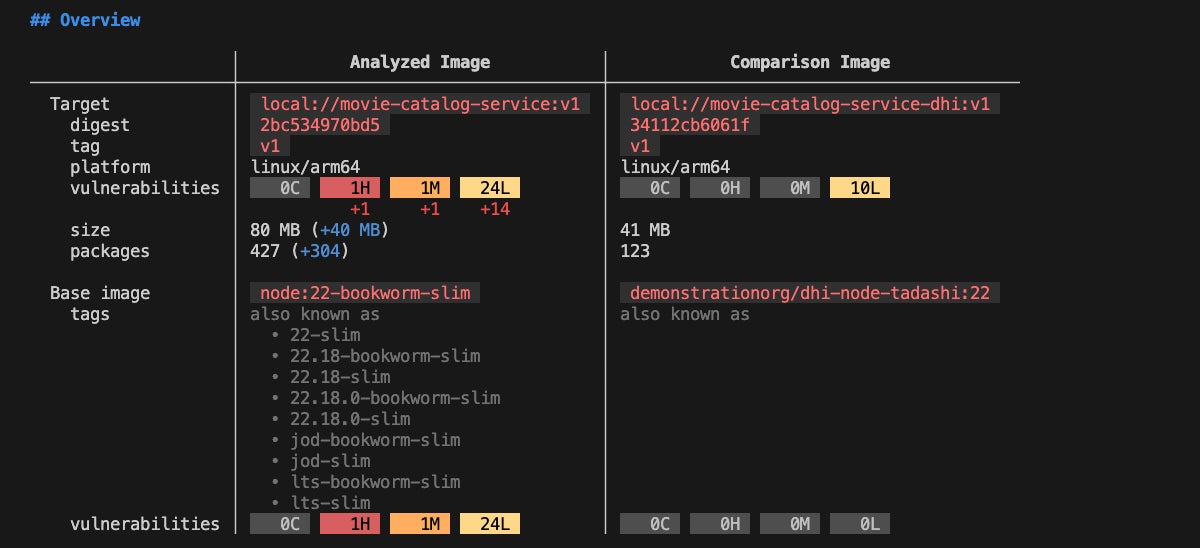
Docker Scout offers a helpful command docker scout compare , that allows you to analyze and compare two images. We’ll use it to evaluate the difference in size and package footprint between node:22-slim and dhi-node:22 based images.
docker scout compare local://movie-catalog-service:v1 --to local://movie-catalog-service-dhi:v1

Figure 4: Comparison of the node:22 and dhi-node:22 based movie-catalog-service images
As you can see, the original node:22-slim based image was 80 MB in size and included 427 packages, while the dhi-node:22 based image is just 41 MB with only 123 packages.
By switching to a Docker Hardened Image, we reduced the image size by nearly 50 percent and cut down the number of packages by more than three times, significantly reducing the attack surface.
Final Step: Validate with local API tests
Last but not least, after migrating to a DHI base image, we should verify that the application still functions as expected.
Since we’ve already implemented Testcontainers-based tests, we can easily ensure that the API remains accessible and behaves correctly.
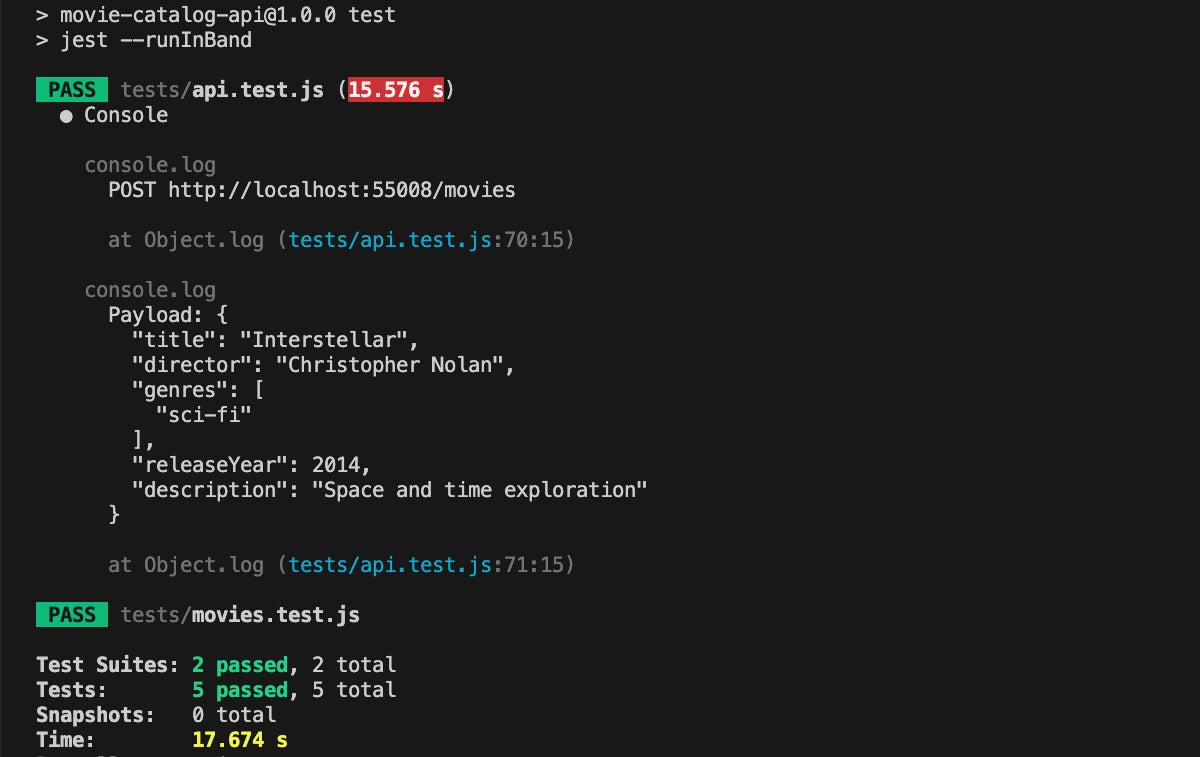
Let’s run the tests using the npm test command.

Figure 5: Local API test execution results
As you can see, the container was built and started successfully. In less than 20 seconds, we were able to verify that the application functions correctly and integrates properly with Postgres.
At this point, we can push the changes to the remote repository, confident that the application is both secure and fully functional, and move on to the next task.
Further integration with external security tools
In addition to providing a minimal and secure base image, Docker Hardened Images include a comprehensive set of attestations. These include a Software Bill of Materials (SBOM), which details all components, libraries, and dependencies used during the build process, as well as Vulnerability Exploitability eXchange (VEX). VEX offers contextual insights into vulnerabilities, specifying whether they are actually exploitable in a given environment, helping teams prioritize remediation.
Let’s say you’ve committed your code changes, built the application, and pushed a container image. Now you want to verify the security posture using an external scanning tool you already use, such as Grype or Trivy. That requires vulnerability information in a compatible format, which Docker Scout can generate for you.
First, you can view the list of available attestations using the docker scout attest command:
docker scout attest list demonstrationorg/movie-catalog-service-dhi:v1 --platform linux/arm64
This command returns a detailed list of attestations bundled with the image. For example, you might see two OpenVEX files: one for the DHI base image and another for any custom exceptions (like no-dsa) specific to your image.
Then, to integrate this information with external tools, you can export the VEX data into a vex.json file. Starting Docker Scout v1.18.3 you can use the docker scout vex get command to get the merged VEX document from all VEX attestations:
docker scout vex get demonstrationorg/movie-catalog-service-dhi:v1 --output vex.json
This generates a vex.json file containing all VEX statements for the specified image. Tools that support VEX can then use this file to suppress known non-exploitable CVEs.
To use the VEX information with Grype or Trivy, pass the –vex flag during scanning:
trivy image demonstrationorg/movie-catalog-service-dhi:v1 --vex vex.json
This ensures your security scanning results are consistent across tools, leveraging the same set of vulnerability contexts provided by Docker Scout.
Conclusion
Shifting left is about more than just early testing. It’s a proactive mindset for building secure, production-ready software from the beginning.
This proactive approach combines:
- Real infrastructure testing using Testcontainers
- End-to-end supply chain visibility and actionable insights with Docker Scout
- Trusted, minimal base images through Docker Hardened Images
Together, these tools help catch issues early, improve compliance, and reduce security risks in the software supply chain.
Learn more and request access to Docker Hardened Images!


