This is the second part of the blog post series on how to containerize our Python development. In part 1, we have already shown how to containerize a Python service and the best practices for it. In this part, we discuss how to set up and wire other components to a containerized Python service. We show a good way to organize project files and data and how to manage the overall project configuration with Docker Compose. We also cover the best practices for writing Compose files for speeding up our containerized development process.
Managing Project Configuration with Docker Compose
Let’s take as an example an application for which we separate its functionality in three-tiers following a microservice architecture. This is a pretty common architecture for multi-service applications. Our example application consists of:
- a UI tier – running on an nginx service
- a logic tier – the Python component we focus on
- a data tier – we use a mysql database to store some data we need in the logic tier

The reason for splitting an application into tiers is that we can easily modify or add new ones without having to rework the entire project.
A good way to structure the project files is to isolate the file and configurations for each service. We can easily do this by having a dedicated directory per service inside the project one. This is very useful to have a clean view of the components and to easily containerize each service. It also helps in manipulating service specific files without having to worry that we could modify by mistake other service files.
For our example application, we have the following directories:
Project
├─── web
└─── app
└─── db
We have already covered how to containerize a Python component in the first part of this blog post series. Same applies for the other project components but we skip the details for them as we can easily access samples implementing the structure we discuss here. The nginx-flask-mysql example provided by the awesome-compose repository is one of them.
This is the updated Project structure with the Dockerfile in place. Assume we have a similar setup for the web and db components.
Project
├─── web
├─── app
│ ├─── Dockerfile
│ ├─── requirements.txt
│ └─── src
│ └─── server.py
└─── db
We could now start the containers manually for all our containerized project components. However, to make them communicate we have to manually handle the network creation and attach the containers to it. This is fairly complicated and it would take precious development time if we need to do it frequently.
Here is where Docker Compose offers a very easy way of coordinating containers and spinning up and taking down services in our local environment. For this, all we need to do is write a Compose file containing the configuration for our project’s services. Once we have it, we can get the project running with a single command.
Compose file
Let’s see what is the structure of the Compose files and how we can manage the project services with it.
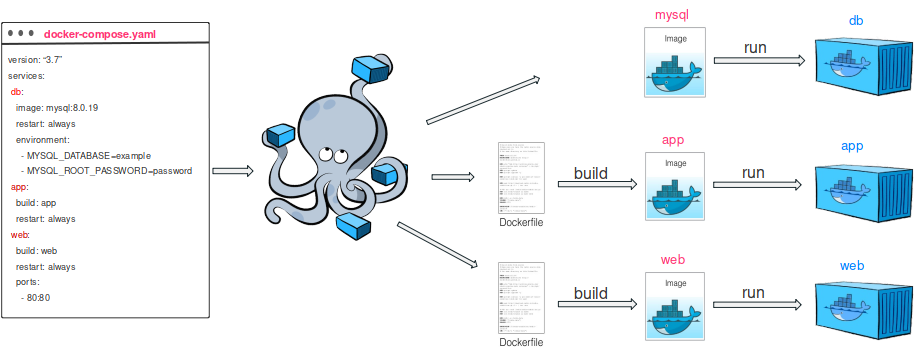
Below is a sample file for our project. As you can see we define a list of services. In the db section we specify the base image directly as we don’t have any particular configuration to apply to it. Meanwhile our web and app service are going to have the image built from their Dockerfiles. According to where we can get the service image we can either set the build or the image field. The build field requires a path with a Dockerfile inside.
docker-compose.yaml
version: “3.7”
services:
db:
image: mysql:8.0.19
command: ‘–default-authentication-plugin=mysql_native_password’
restart: always
environment:
– MYSQL_DATABASE=example
– MYSQL_ROOT_PASSWORD=password
app:
build: app
restart: always
web:
build: web
restart: always
ports:
– 80:80
To initialize the database we can pass environment variables with the DB name and password while for our web service we map the container port to the localhost in order to be able to access the web interface of our project.
Let’s see how to deploy the project with Docker Compose.
All we need to do now is to place the docker-compose.yaml at the root directory of the project and then issue the command for deployment with docker-compose.
Project
├─── docker-compose.yaml
├─── web
├─── app
└─── db
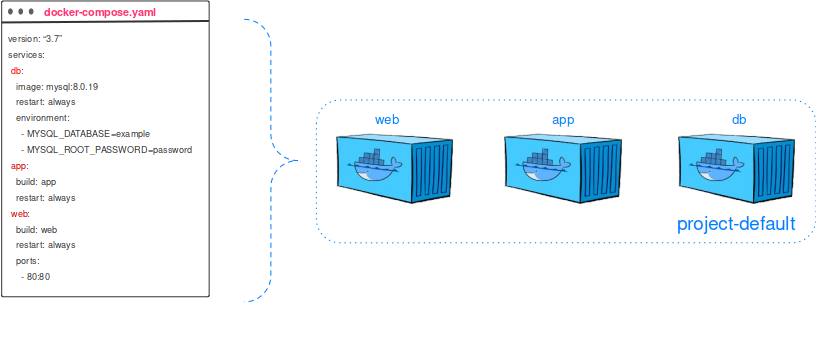
Docker Compose is going to take care of pulling the mysql image from Docker Hub and launching the db container while for our web and app service, it builds the images locally and then runs the containers from them. It also takes care of creating a default network and placing all containers in it so that they can reach each other.

All this is triggered with only one command.
$ docker-compose up -d
Creating network “project_default” with the default driver
Pulling db (mysql:8.0.19)…
…
Status: Downloaded newer image for mysql:8.0.19
Building app
Step 1/6 : FROM python:3.8
—> 7f5b6ccd03e9
Step 2/6 : WORKDIR /code
—> Using cache
—> c347603a917d
Step 3/6 : COPY requirements.txt .
—> fa9a504e43ac
Step 4/6 : RUN pip install -r requirements.txt
—> Running in f0e93a88adb1
Collecting Flask==1.1.1
…
Successfully tagged project_app:latest
WARNING: Image for service app was built because it did not already exist. To rebuild this image you must use docker-compose build or docker-compose up --build.
Building web
Step 1/3 : FROM nginx:1.13-alpine
1.13-alpine: Pulling from library/nginx
…
Status: Downloaded newer image for nginx:1.13-alpine
—> ebe2c7c61055
Step 2/3 : COPY nginx.conf /etc/nginx/nginx.conf
—> a3b2a7c8853c
Step 3/3 : COPY index.html /usr/share/nginx/html/index.html
—> 9a0713a65fd6
Successfully built 9a0713a65fd6
Successfully tagged project_web:latest
Creating project_web_1 … done
Creating project_db_1 … done
Creating project_app_1 … done
Check the running containers:
$ docker-compose ps
Name Command State Ports
————————————————————————-
project_app_1 /bin/sh -c python server.py Up
project_db_1 docker-entrypoint.sh –def … Up 3306/tcp, 33060/tcp
project_web_1 nginx -g daemon off; Up 0.0.0.0:80->80/tcp
To stop and remove all project containers run:
$ docker-compose down
Stopping project_db_1 … done
Stopping project_web_1 … done
Stopping project_app_1 … done
Removing project_db_1 … done
Removing project_web_1 … done
Removing project_app_1 … done
Removing network project-default
To rebuild images we can run a build and then an up command to update the state of the project containers:
$ docker-compose build
$ docker-compose up -d
As we can see, it is quite easy to manage the lifecycle of the project containers with docker-compose.
Best practices for writing Compose files
Let us analyse the Compose file and see how we can optimise it by following best practices for writing Compose files.
Network separation
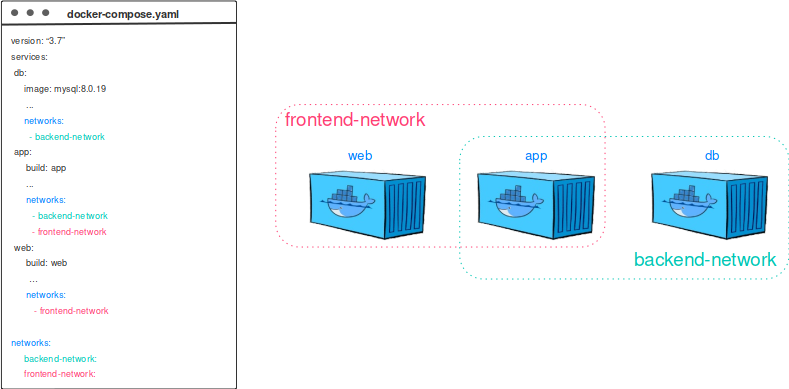
When we have several containers we need to control how to wire them together. We need to keep in mind that, as we do not set any network in the compose file, all our containers will end in the same default network.

This may not be a good thing if we want only our Python service to be able to reach the database. To address this issue, in the compose file we can actually define separate networks for each pair of components. In this case the web component won’t be able to access the DB.

Docker Volumes
Every time we take down our containers, we remove them and therefore lose the data we stored in previous sessions. To avoid that and persist DB data between different containers, we can exploit named volumes. For this, we simply define a named volume in the Compose file and specify a mount point for it in the db service as shown below:
version: “3.7”
services:
db:
image: mysql:8.0.19
command: ‘–default-authentication-plugin=mysql_native_password’
restart: always
volumes:
– db-data:/var/lib/mysql
networks:
– backend-network
environment:
– MYSQL_DATABASE=example
– MYSQL_ROOT_PASSWORD=password
app:
build: app
restart: always
networks:
– backend-network
– frontend-network
web:
build: web
restart: always
ports:
– 80:80
networks:
– frontend-network
volumes:
db-data:
networks:
backend-network:
frontend-network:
We can explicitly remove the named volumes on docker-compose down if we want.
Docker Secrets
As we can observe in the Compose file, we set the db password in plain text. To avoid this, we can exploit docker secrets to have the password stored and share it securely with the services that need it. We can define secrets and reference them in services as below. The password is being stored locally in the project/db/password.txt file and mounted in the containers under /run/secrets/<secret-name>.
version: “3.7”
services:
db:
image: mysql:8.0.19
command: ‘–default-authentication-plugin=mysql_native_password’
restart: always
secrets:
– db-password
volumes:
– db-data:/var/lib/mysql
networks:
– backend-network
environment:
– MYSQL_DATABASE=example
– MYSQL_ROOT_PASSWORD_FILE=/run/secrets/db-password
app:
build: app
restart: always
secrets:
– db-password
networks:
– backend-network
– frontend-network
web:
build: web
restart: always
ports:
– 80:80
networks:
– frontend-network
volumes:
db-data:
secrets:
db-password:
file: db/password.txt
networks:
backend-network:
frontend-network:
We have now a well defined Compose file for our project that follows best practices. An example application exercising all the aspects we discussed can be found here.
What’s next?
This blog post showed how to set up a container-based multi-service project where a Python service is wired to other services and how to deploy it locally with Docker Compose.
In the next and final part of this series, we show how to update and debug the containerized Python component.
Resources
- Project sample
- Docker Compose
- Project skeleton samples
